Introduction
This is my solution to the reversing challenge from the Meta Flash CTF of January 2025, titled “I Heard You Liked Loaders.”
For flash CTF challenges, the most efficient method is to directly debug the binary and perform dynamic analysis. However, in this write-up, I will attempt to solve it statically, which I find more interesting.
Speedrun Solution
If you’re looking for a quick win, the binary can be easily debugged using gdb. The process is straightforward:
> next
> next
> next
> set $rax=0  // antidebug bypass
> next
> next
> next
> get flag
It’s as easy as installing a Windows program.
</joke>, not so easy, but something like that.
Initial Binary Analysis
The challenge title and filename (loader) suggest that the binary might be loading or unpacking additional code at runtime.
Let’s start by identifying the binary type:
$ file loader
loader: ELF 64-bit LSB pie executable, x86-64, version 1 (SYSV), dynamically linked, interpreter /lib64/ld-linux-x86-64.so.2, for GNU/Linux 4.4.0, BuildID[sha1]=041598d614a2a880192ec270ae2b0523e9db0631, not stripped
This tells us it’s a 64-bit ELF PIE executable, dynamically linked, and not stripped, so symbols are intact, which will help with analysis.
I loaded the binary in r2 to analyze its contents.
[0x00001050]> afl
0x00001030    1      6 sym.imp.__stack_chk_fail
0x00001040    1      6 sym.imp.mmap
0x00001050    1     37 entry0
0x00001474    1     13 sym._fini
0x00001149    3    808 main
0x00001000    3     27 sym._init
0x00001140    5     60 entry.init0
0x000010f0    5     55 entry.fini0
0x00001080    4     34 fcn.00001080
The presence of mmap is a clue that some dynamic memory operations are taking place.
Dissecting the main Function
The main function consists of two distinct parts:
- Setup Phase: It loads values into variables and calls
mmapto allocate a 0x400-byte memory region with executable permissions.
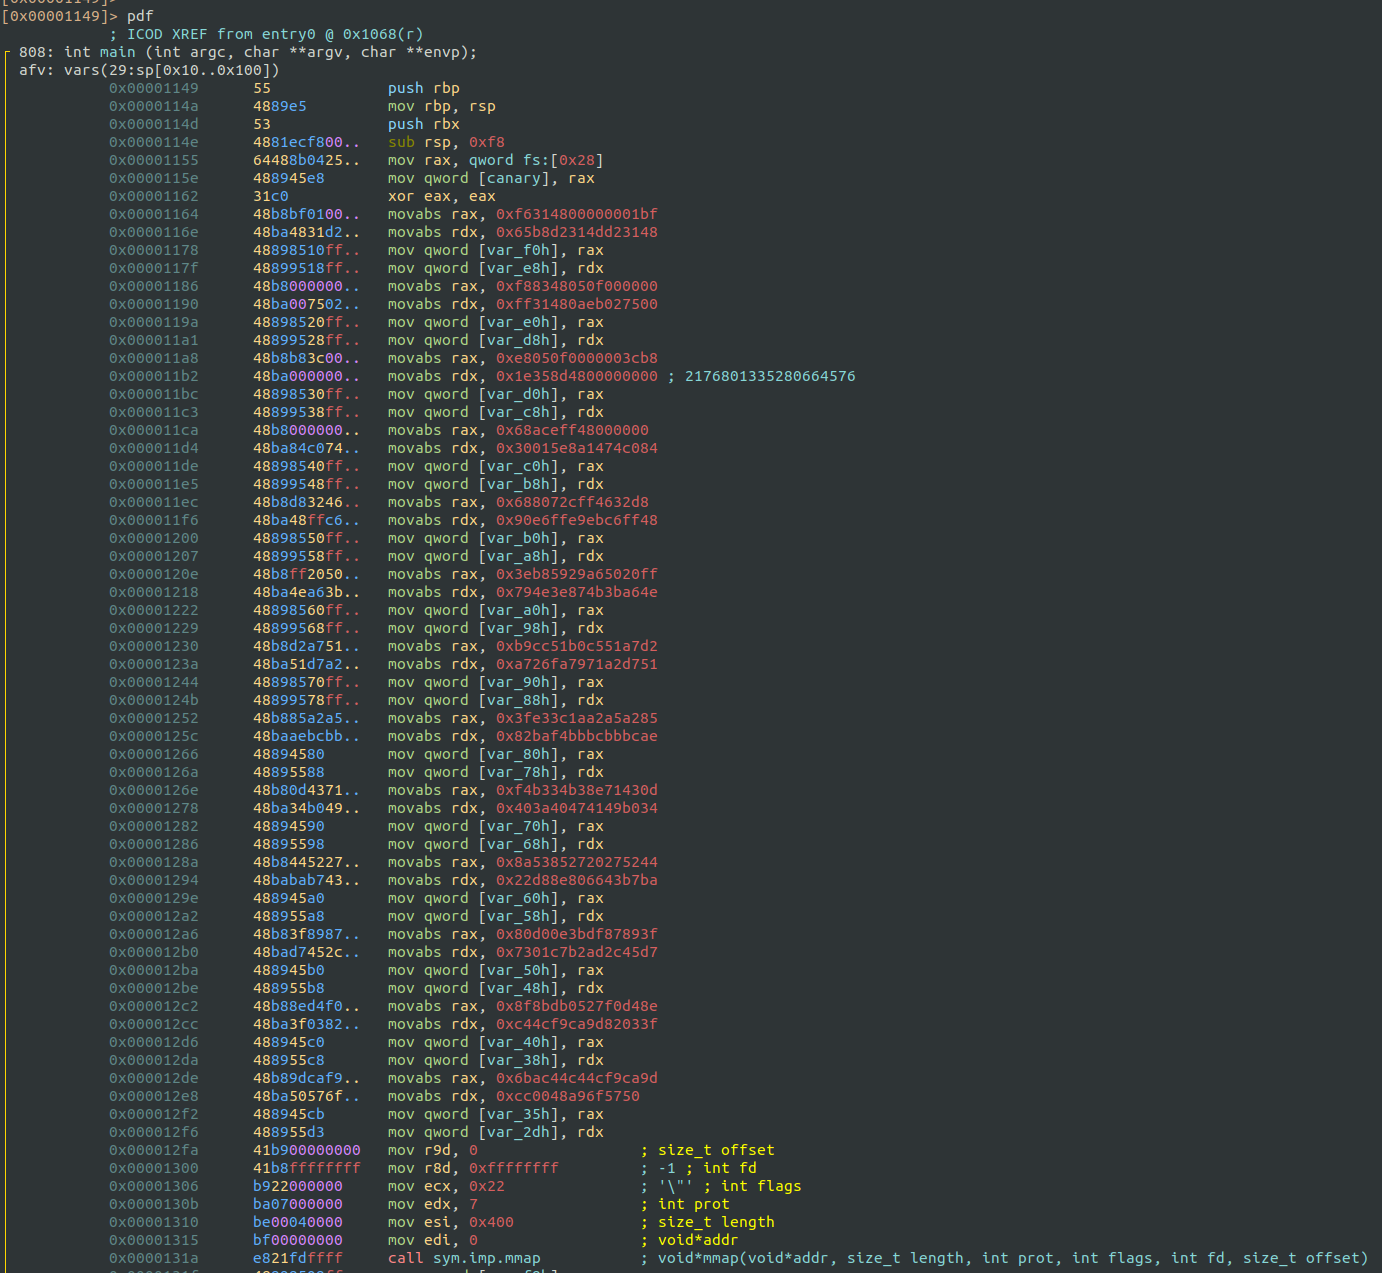
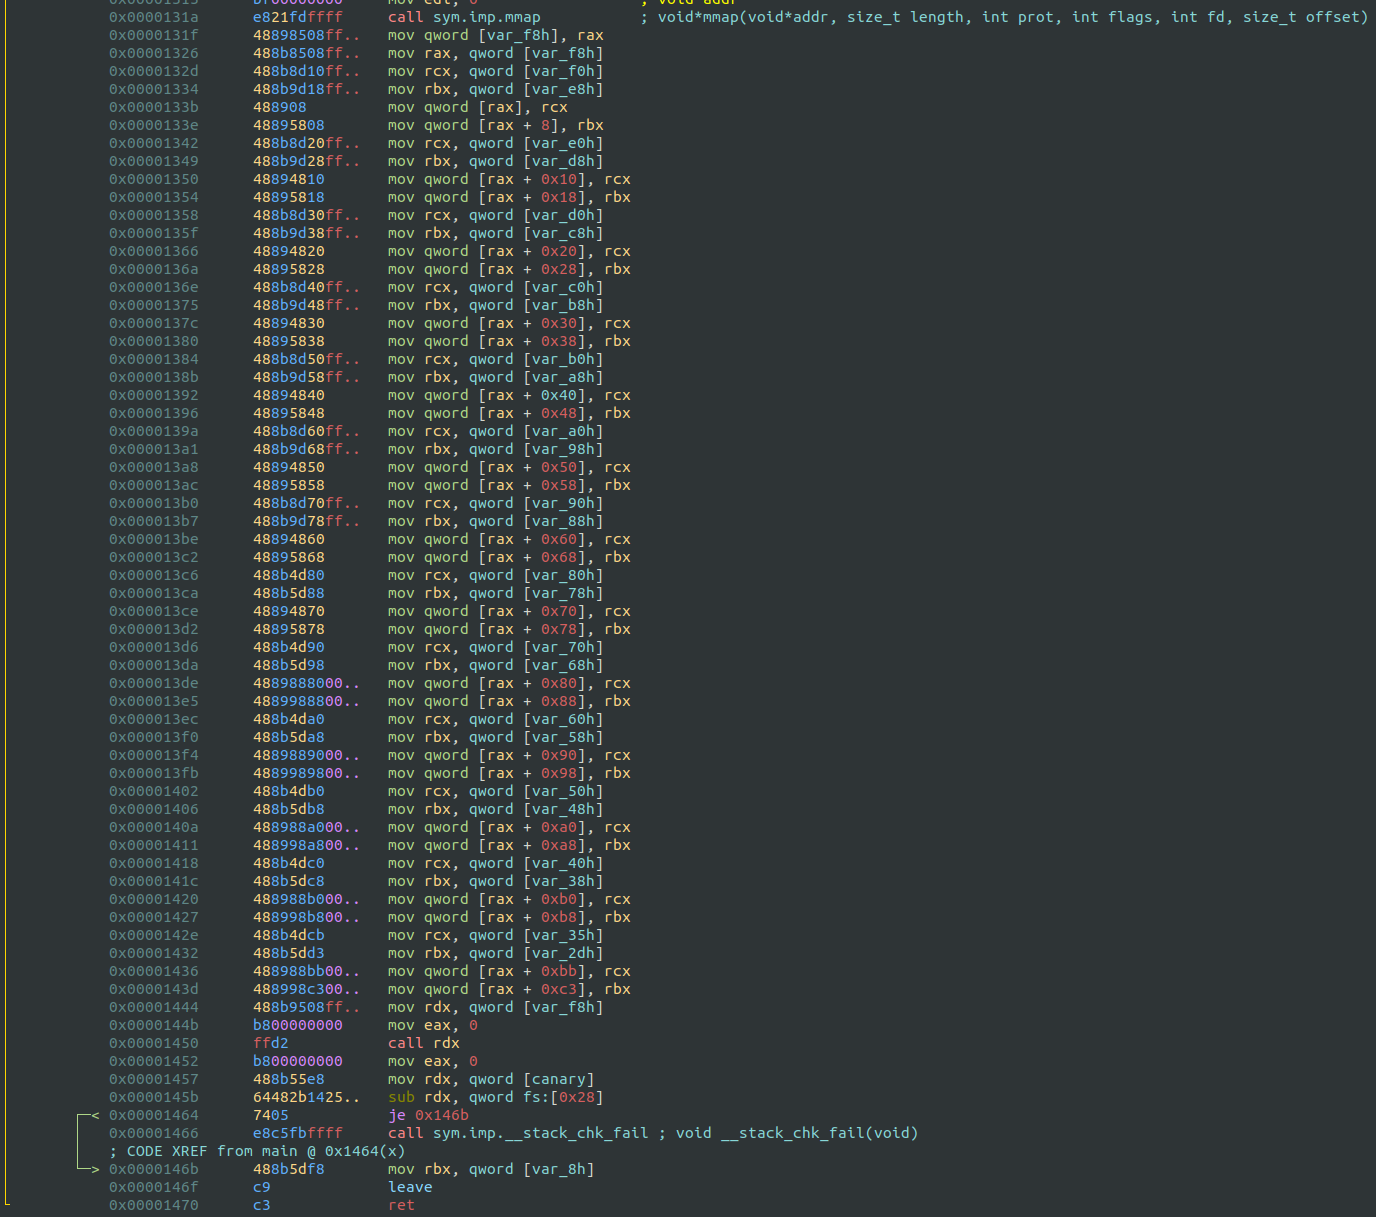
- Execution Phase: The data is copied into the allocated region, and execution is transferred to it, indicating that the binary is running some embedded shellcode or bytecode.
Extracting the Bytecode
To analyze the embedded code, I extracted the bytecode from the memory region allocated by mmap. Here’s the Python script I used to extract it:
from pwn import *

bytecode_1 = p64(0xf6314800000001bf) \
           + p64(0x65b8d2314dd23148) \
           + p64(0xf88348050f000000) \
           + p64(0xff31480aeb027500) \
           + p64(0xe8050f0000003cb8) \
           + p64(0x1e358d4800000000) \
           + p64(0x68aceff48000000)  \
           + p64(0x30015e8a1474c084) \
           + p64(0x688072cff4632d8)  \
           + p64(0x90e6ffe9ebc6ff48) \
           + p64(0x3eb85929a65020ff) \
           + p64(0x794e3e874b3ba64e) \
           + p64(0xb9cc51b0c551a7d2) \
           + p64(0xa726fa7971a2d751) \
           + p64(0x3fe33c1aa2a5a285) \
           + p64(0x82baf4bbbcbbbcae) \
           + p64(0xf4b334b38e71430d) \
           + p64(0x403a40474149b034) \
           + p64(0x8a53852720275244) \
           + p64(0x22d88e806643b7ba) \
           + p64(0x80d00e3bdf87893f) \
           + p64(0x7301c7b2ad2c45d7) \
           + p64(0x8f8bdb0527f0d48e) \
           + p64(0xc44cf9ca9d82033f) \
           + p64(0x6bac44c44cf9ca9d) \
           + p64(0xcc0048a96f5750)

with open("bytecode_1", "bw") as f:
    f.write(bytecode_1)
Bytecode 1
I named this bytecode bytecode_1, and loaded into r2 again.
Spoiler alert: it won’t be the only one.
The total size of this bytecode is 0xd0 bytes.
Anti-Debugging Check
At the beginning of the bytecode, there’s a simple anti-debugging technique using syscalls. Debuggers like gdb rely on the ptrace syscall to attach to a running process. Since only one process can attach using ptrace at a time, the program can detect if it’s being debugged by attempting to call ptrace itself. If the call fails, it knows a debugger is present and exits.
For reference, syscall information and their arguments can be found here. Alternatively, Radare2’s emulation features also help in identifying syscalls and their arguments:

| rax | System Call | rdi (request) | rsi (pid) | rdx (addr) | r10 (data) |
|---|---|---|---|---|---|
| 101 | sys_ptrace | 1 (PTRACE_TRACEME) | 0 | 0 | 0 |
In pseudocode, the anti-debugging logic looks like this:
void fcn.bytecode_1() {
    int is_debug = ptrace(1, 0, 0, 0);
    if (is_debug) {
        exit(0);  // Exit if a debugger is detected
    }
    // Continue execution if no debugger is detected
}
Decryption Function
After the anti-debugging check, the bytecode proceeds to decrypt another portion of itself. From address 0x50, the following bytes appear encrypted, showing random or invalid opcodes in their raw form:
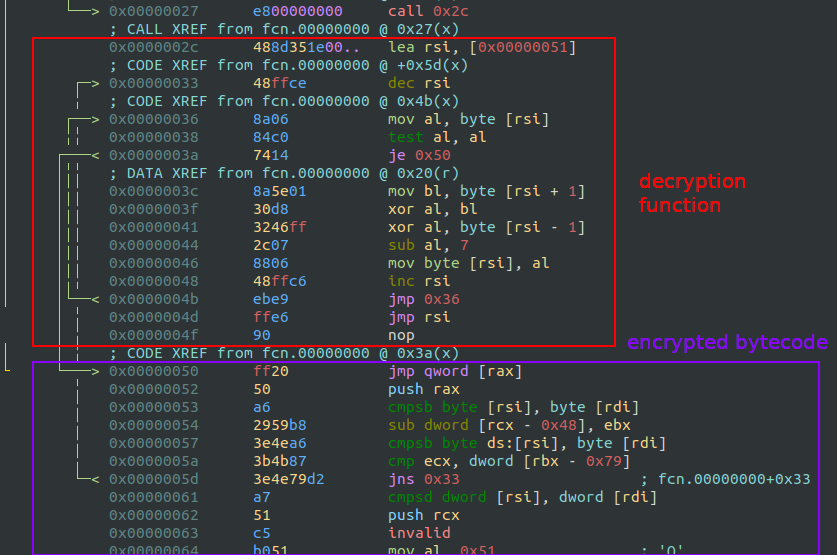
To analyze the next stage, I wrote a simple C function to manually decrypt this section of the bytecode.
I started with the output of the Ghidra decompiler (pdg), but it was difficult to read and ended up rewriting it all again. For a small function like this, it’s better to analyze directly the assembly.
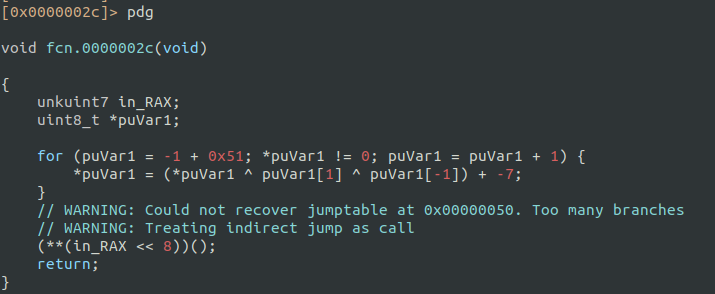
The Radare2 command pcq (Print Characters Quoted) is handy here to copy the encrypted bytes.
unsigned char encrypted[] = {
    0xff, 0x20, 0x50, 0xa6, 0x29, 0x59, 0xb8, 0x3e, 0x4e, 0xa6
    // ...

};

void decrypt_bytes() {
    int i = 0;
    unsigned char value, prev;
    while (1) {
        value = encrypted[i];
        if (value == 0) break;
        // Get previous byte (use 0x90 if it's the first element)
        prev = (i == 0) ? 0x90 : encrypted[i-1];
        encrypted[i] = (value ^ encrypted[i+1] ^ prev) - 7;
        i++;
    }
}

int main() {
    FILE *fp;
    size_t size = sizeof(encrypted);

    decrypt_bytes();

    // Save to file
    fp = fopen("bytecode_2", "wb");
    if (fp != NULL) {
        fwrite(encrypted, 1, size, fp);
        fclose(fp);
        printf("Decrypted %ld bytes saved to 'bytecode_2'\n", size);
    } else {
        printf("Error: Could not create output file\n");
    }
    return 0;
}
Bytecode 2
The second bytecode is quite similar to the first one, with only minor modifications.
Initial Setup: Register Cleaning and INT3
At the beginning of this bytecode, there’s some register clearing followed by an INT3 instruction.
From Wikipedia:
The INT3 instruction is a one-byte-instruction defined for use by debuggers to temporarily replace an instruction in a running program in order to set a code breakpoint.
This INT3 is likely placed there to help those debugging the challenge dynamically, reducing the difficulty of the challenge. It allows easy pausing right before the next stage of execution.
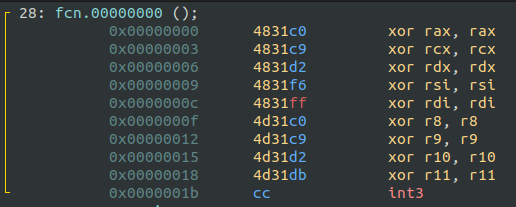
However, since I’m solving this statically, the breakpoint doesn’t matter.
Decryption Function
After the initial setup, we find another decryption routine. This time, the decryption logic is even simpler than in the first bytecode. It just XORs the current byte with the previous one.
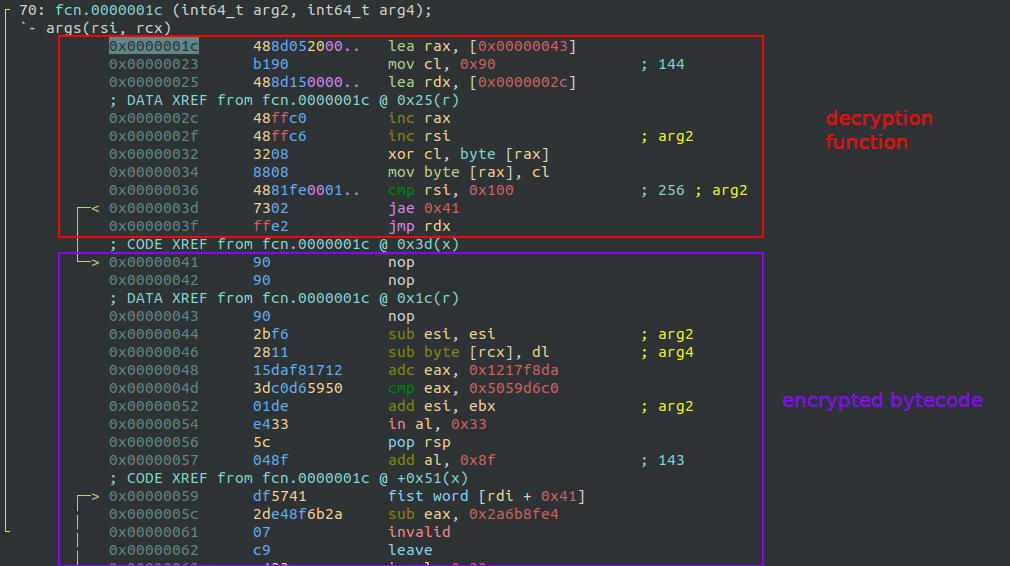
I reused the same C code from the first bytecode but updated the payload and simplified the decryption logic to match the new XOR behavior:
unsigned char encrypted[] = {
    0x2b, 0xf6, 0x28, 0x11, 0x15, 0xda, 0xf8, 0x17, 0x12, 0x3d,
    0xc0, 0xd6, 0x59, 0x50, 0x01, 0xde, 0xe4, 0x33, 0x5c, 0x04,
    // ...

};

void decrypt_bytes() {
    int i = 0;
    unsigned char value, prev;
    while (1) {
        value = encrypted[i];
        if (value == 0) break;
        // Get previous byte (use 0x90 if it's the first element)
        prev = (i == 0) ? 0x90 : encrypted[i-1];
        encrypted[i] = (value ^ prev);
        i++;
    }
}

int main() {
    FILE *fp;
    size_t size = sizeof(encrypted);

    decrypt_bytes();

    // Save to file
    fp = fopen("bytecode_3", "wb");
    if (fp != NULL) {
        fwrite(encrypted, 1, size, fp);
        fclose(fp);
        printf("Decrypted %ld bytes saved to 'bytecode_3'\n", size);
    } else {
        printf("Error: Could not create output file\n");
    }
    return 0;
}
Bytecode 3
The final bytecode is smaller in size, 0x64 bytes in total, but only 0x3a of them are the real bytecode. The rest are just some 0xffs from the previous extraction.
Unlike the previous stages, this bytecode doesn’t perform any “complex” operations or print the flag directly.
Instead, it simply moves the flag’s characters into the same register over and over. This kind of obfuscation is designed to make dynamic analysis slightly more challenging, but static tools like Radare2 make this final process straightforward by disclosing the flag.
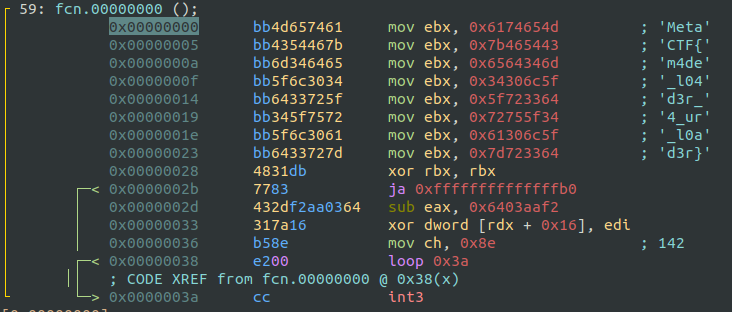
Flag
MetaCTF{m4de_l04d3r_4_ur_l0ad3r}